
00:00:00
还不会Traefik?看这篇文章就够了! 原创
提到 Traefik,有些人可能并不熟悉,但是提到 Nginx,应该都耳熟能详。
暂且我们把 Traefik 当成和 Nginx 差不多的一类软件,待读完整篇文章,你就会对 Traefik 有不一样的认识。
本文主要带大家对 Traefik 有一个全面的认识,我将从下面几个方面作介绍。

本文基于 Traefik 2.5.3 进行介绍。
什么是 Traefik
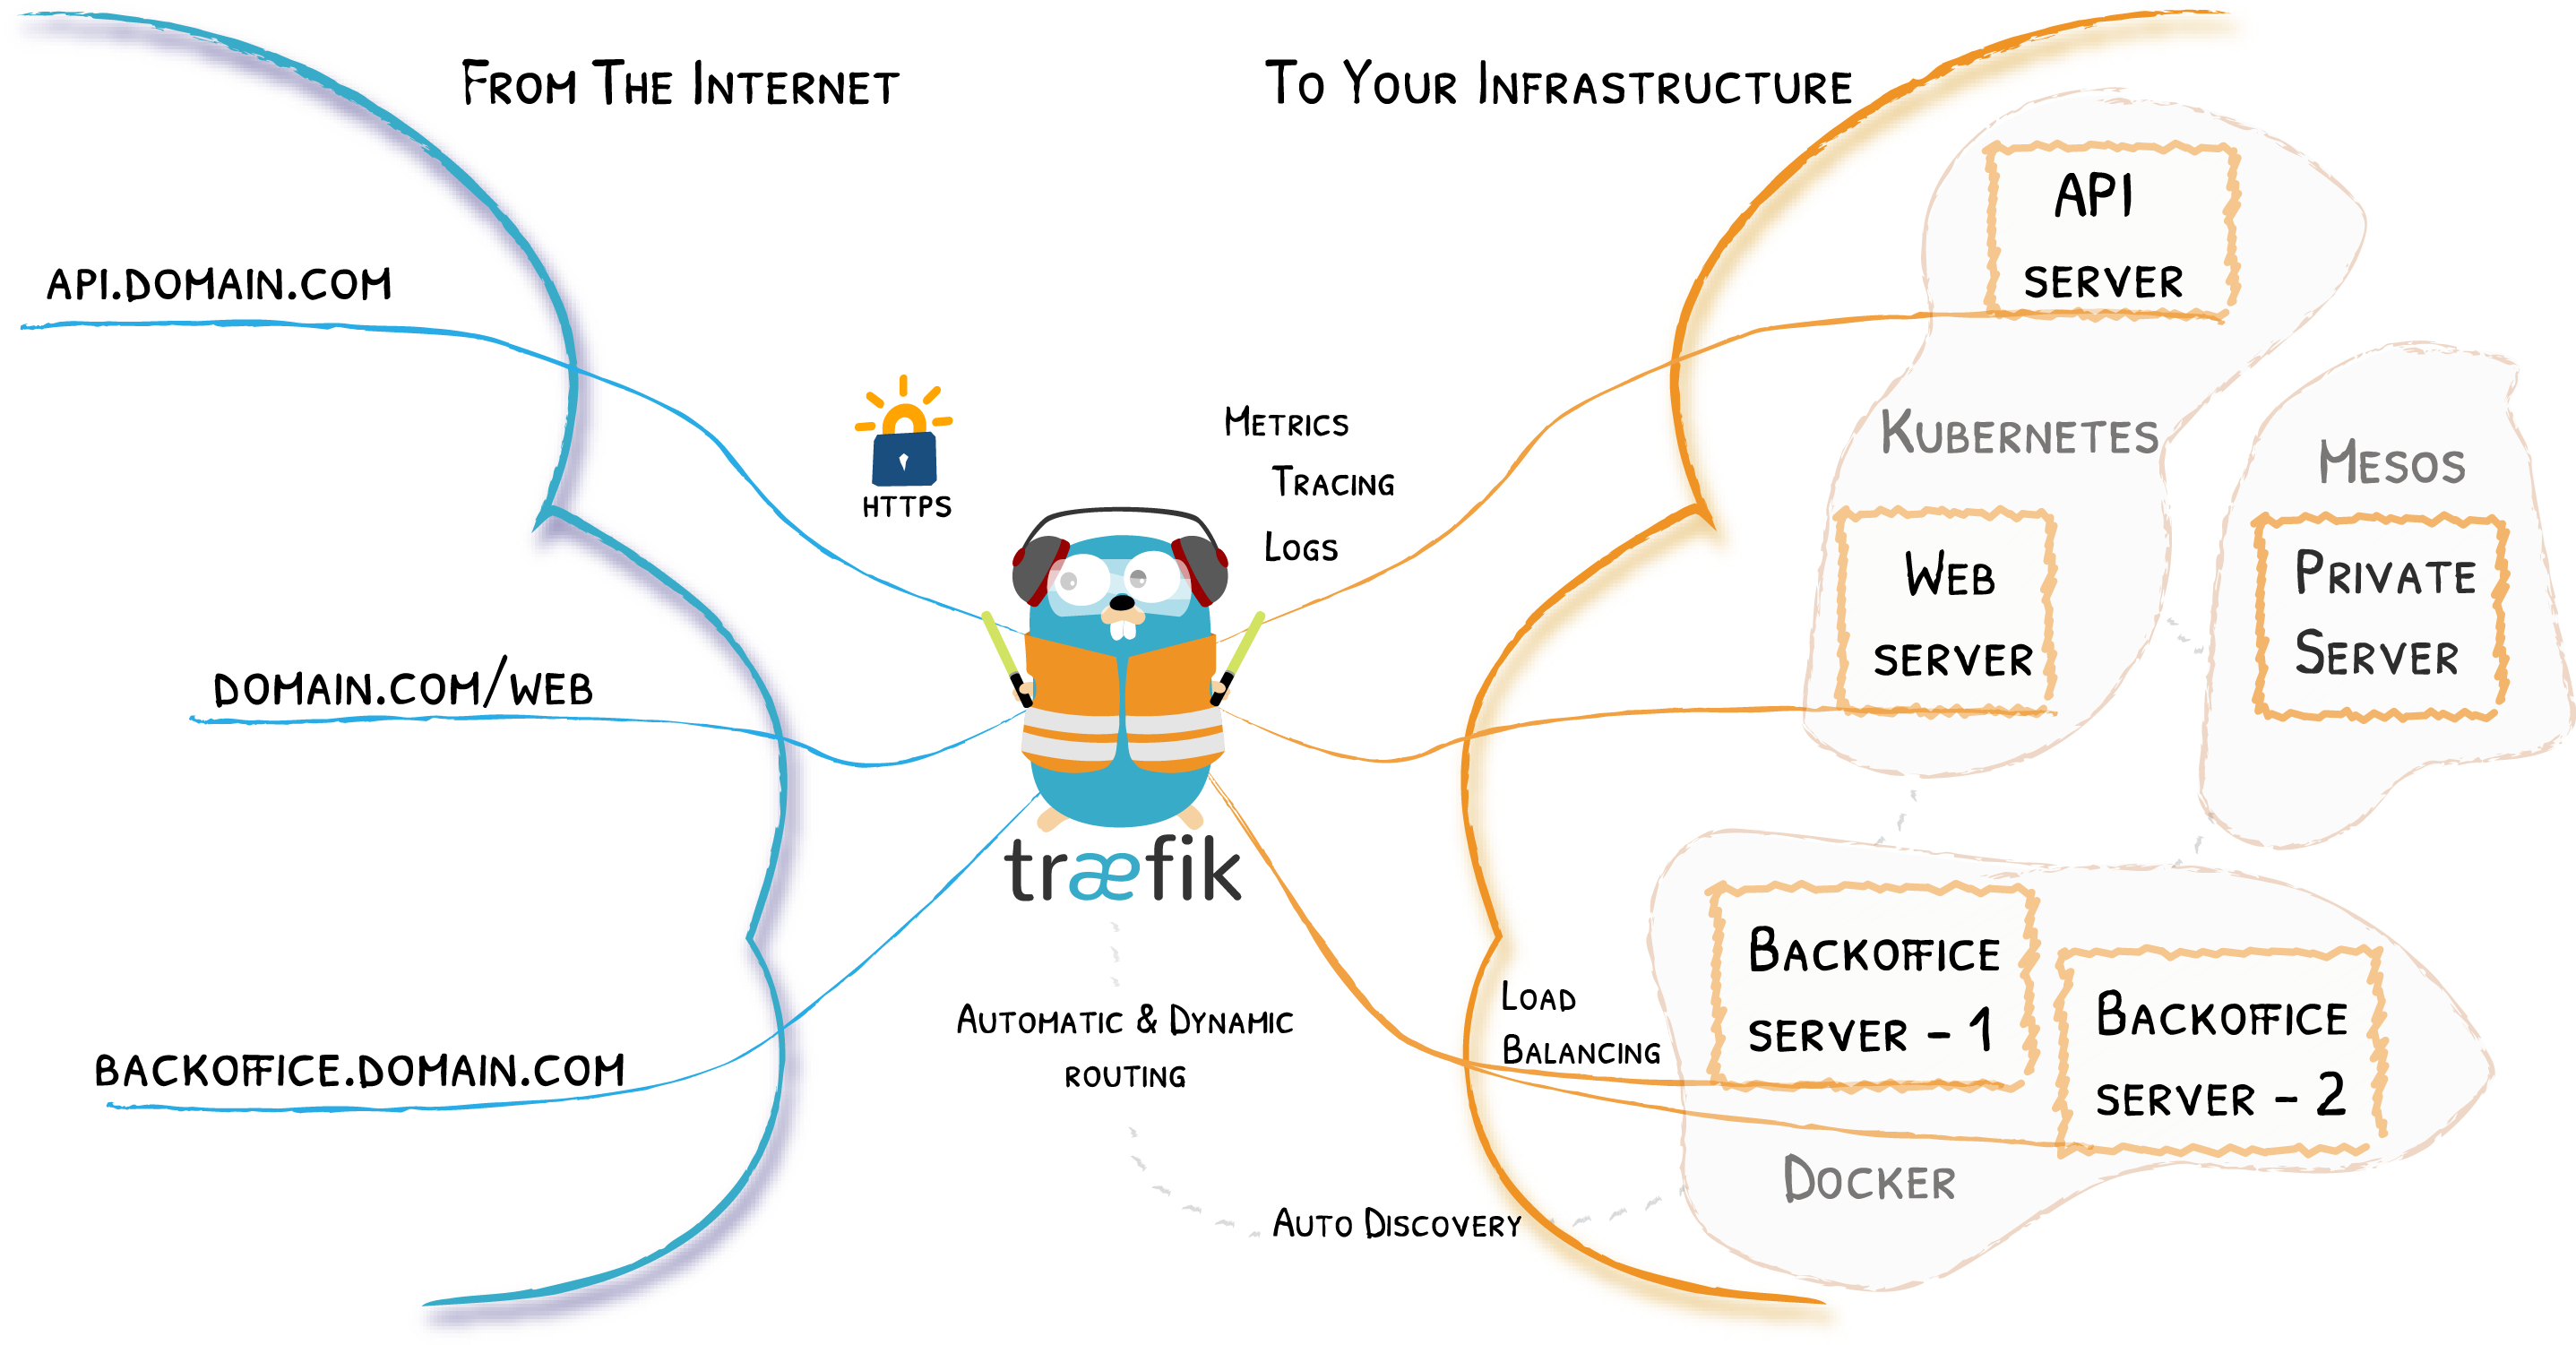
Traefik 是一个开源的边缘路由网关,它简单易用并且功能全面。官方的介绍是:Traefik is an [open-source](https://github.com/traefik/traefik) _Edge Router_ that makes publishing your services a fun and easy experience.
Traefik 原生支持多种集群,如 Kubernetes、Docker、Docker Swarm、AWS、Mesos、Marathon 等;并且可以同时处理许多集群。
Traefik 的核心概念及能力
Traefik 是一个边缘路由器,它会拦截外部的请求并根据逻辑规则选择不同的操作方式,这些规则决定着这些请求到底该如何处理。Traefik 提供自动发现能力,会实时检测服务,并自动更新路由规则。
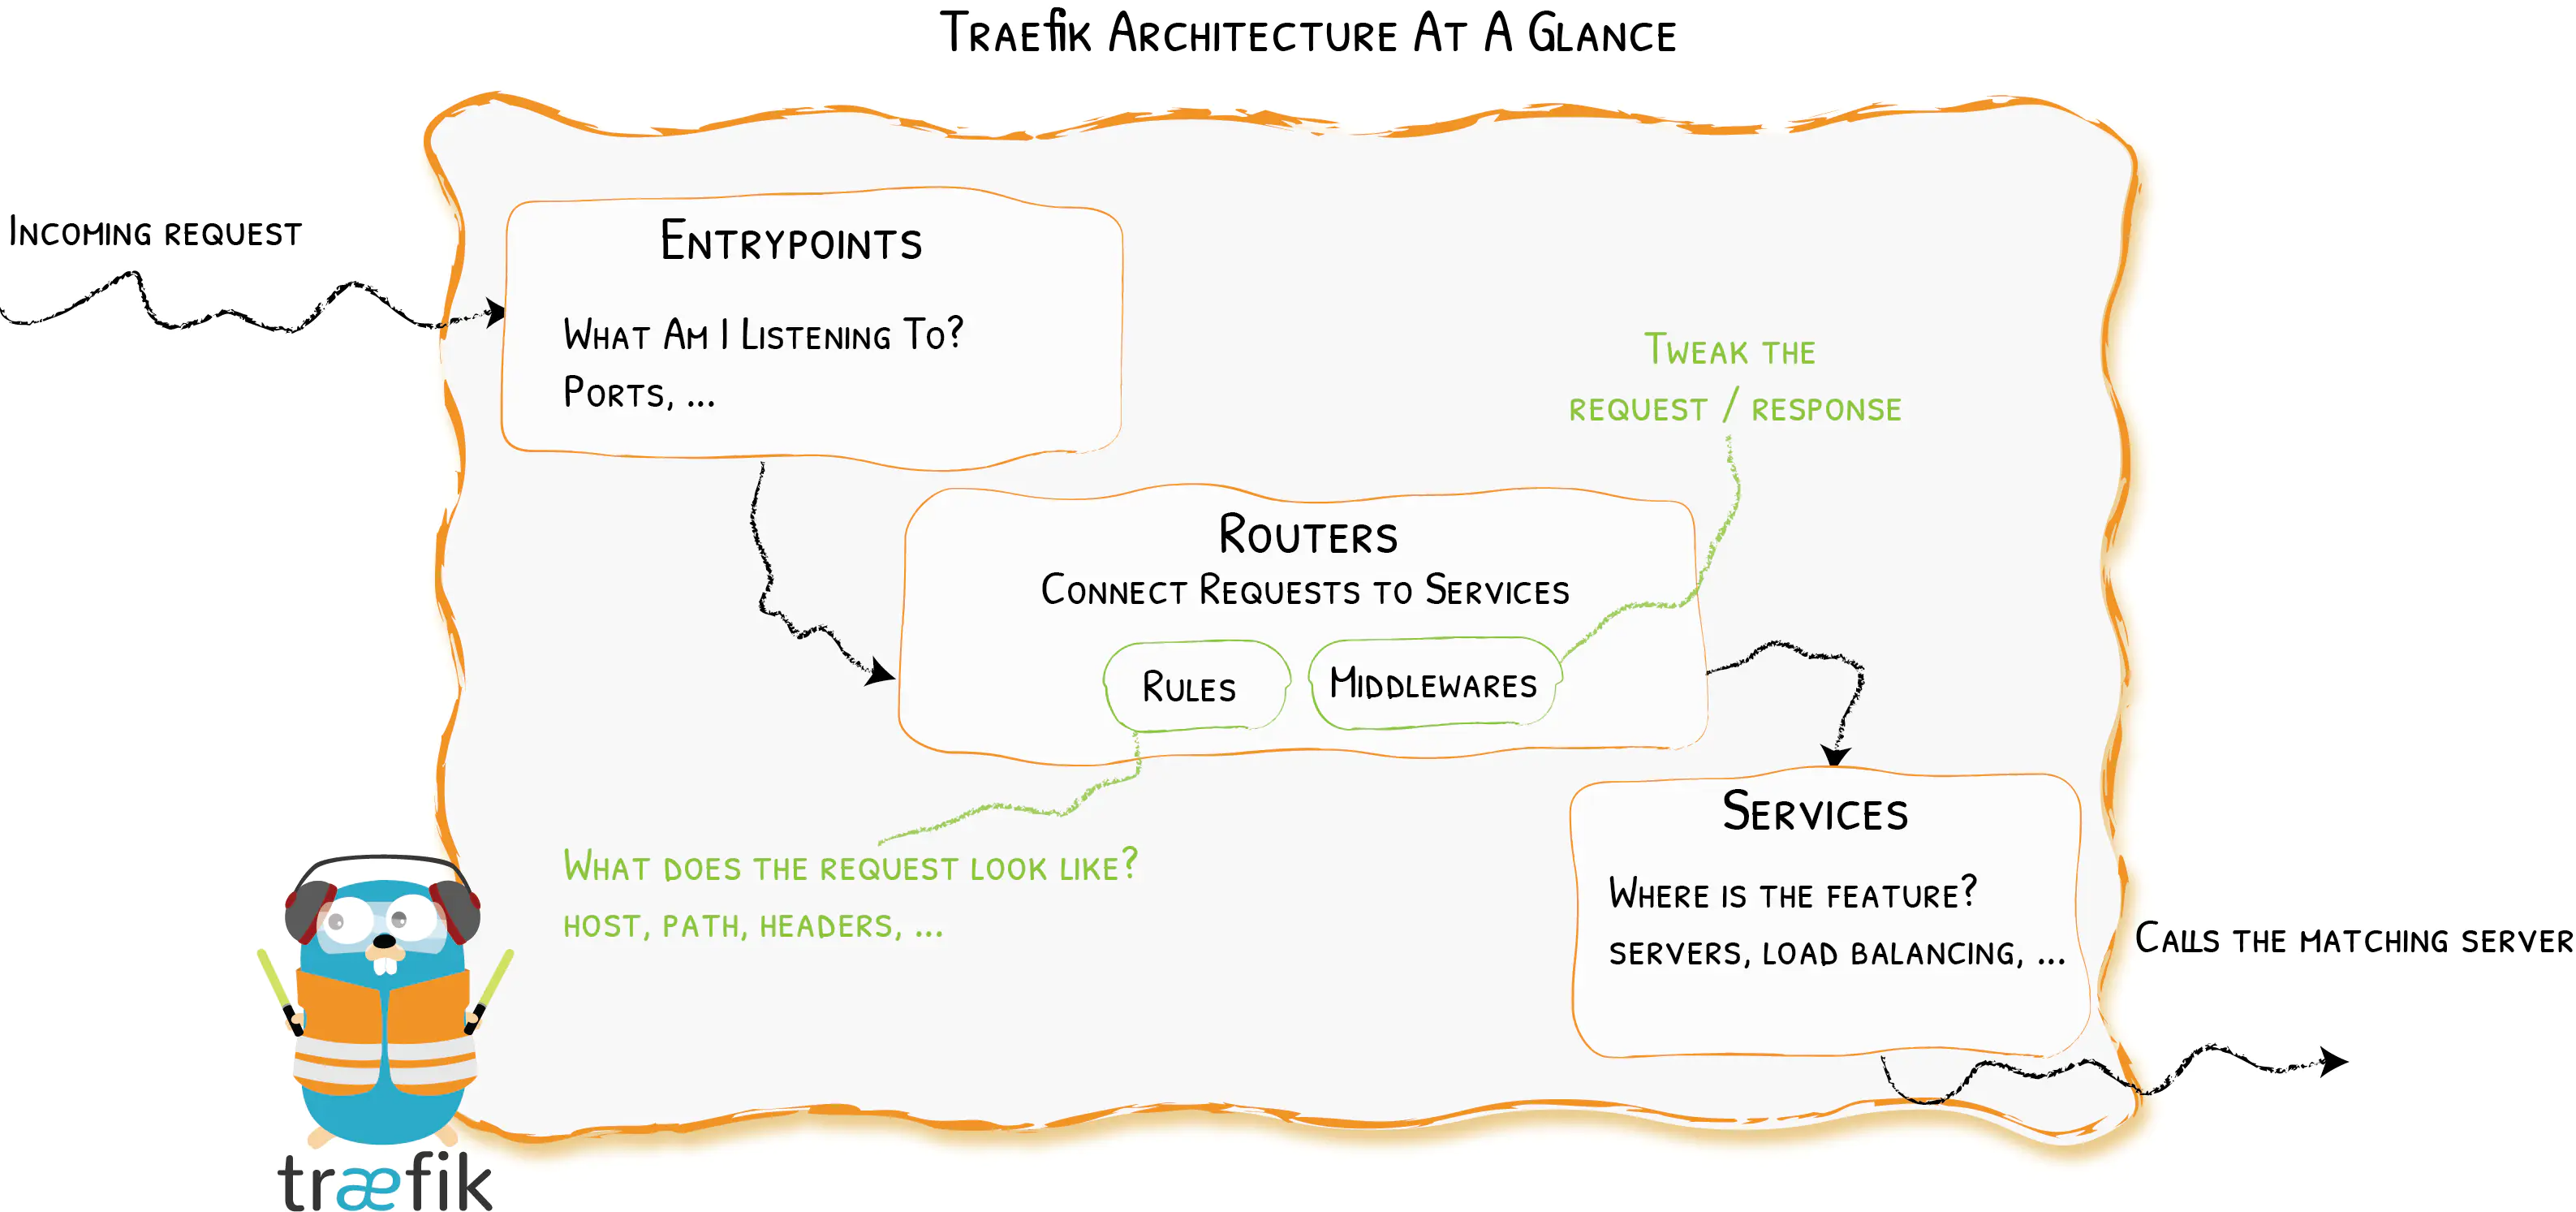
从上图可知,请求首先会连接到entrypoints,然后分析这些请求是否与定义的rules匹配,如果匹配,则会通过一系列middlewares,再到对应的services上。
这就涉及到以下几个重要的核心组件。
Providers
Providers是基础组件,Traefik 的配置发现是通过它来实现的,它可以是协调器,容器引擎,云提供商或者键值存储。
Traefik通过查询Providers的API来查询路由的相关信息,一旦检测到变化,就会动态的更新路由。
Entrypoints
Entrypoints是Traefik的网络入口,它定义接收请求的接口,以及是否监听 TCP 或者 UDP。
Routers
Routers主要用于分析请求,并负责将这些请求连接到对应的服务上去,在这个过程中,Routers 还可以使用 Middlewares 来更新请求,比如在把请求发到服务之前添加一些 Headers。
Services
Services负责配置如何到达最终将处理传入请求的实际服务。
Middlewares
Middlewares用来修改请求或者根据请求来做出一些判断(authentication, rate limiting, headers, ...),中间件被附件到路由上,是一种在请求发送到你的服务之前(或者在服务的响应发送到客户端之前)调整请求的一种方法。
部署 Traefik
Traefik 的部署方式有多种,这里主要采用Helm方式进行部署管理。
Helm 部署
环境:
kubernetes: 1.22.3
helm: 3.7.1
1、添加 traefik helm 仓库
plain
$ helm repo add traefik https://helm.traefik.io/traefik
$ helm repo update2、将 traefik 包下载到本地进行管理
plain
$ helm  search repo traefik
NAME           	CHART VERSION	APP VERSION	DESCRIPTION
traefik/traefik	10.6.0       	2.5.3      	A Traefik based Kubernetes ingress controller
$ helm pull traefik/traefik3、部署 Traefik
默认的value.yaml[2]配置文件配置比较多,可能需要花一定的时间去梳理,不过根据相关的注释还是可以很快的理解。
这里自定义一个配置文件my-value.yaml,如下:
yaml
service:
  type: NodePort

ingressRoute:
  dashboard:
    enabled: false
ports:
  traefik:
    port: 9000
    expose: true
  web:
    port: 8000
    expose: true
  websecure:
    port: 8443
    expose: true
persistence:
  enabled: true
  name: data
  accessMode: ReadWriteOnce
  size: 5G
  storageClass: "openebs-hostpath"
  path: /data
additionalArguments:
  - "--serversTransport.insecureSkipVerify=true"
  - "--api.insecure=true"
- "--api.dashboard=true"进行部署,命令如下:
plain
$ kubectl create ns traefik-ingress
$ helm install traefik -n traefik-ingress -f my-value.yaml .然后可以看到部署结果,如下:
bash
# kubectl get all -n traefik-ingress
NAME                           READY   STATUS    RESTARTS   AGE
pod/traefik-77ff894bb5-qqszd   1/1     Running   0          6m26s

NAME              TYPE       CLUSTER-IP      EXTERNAL-IP   PORT(S)                                     AGE
service/traefik   NodePort   10.108.170.22   <none>        9000:32271/TCP,80:31728/TCP,443:30358/TCP   6m26s

NAME                      READY   UP-TO-DATE   AVAILABLE   AGE
deployment.apps/traefik   1/1     1            1           6m26s

NAME                                 DESIRED   CURRENT   READY   AGE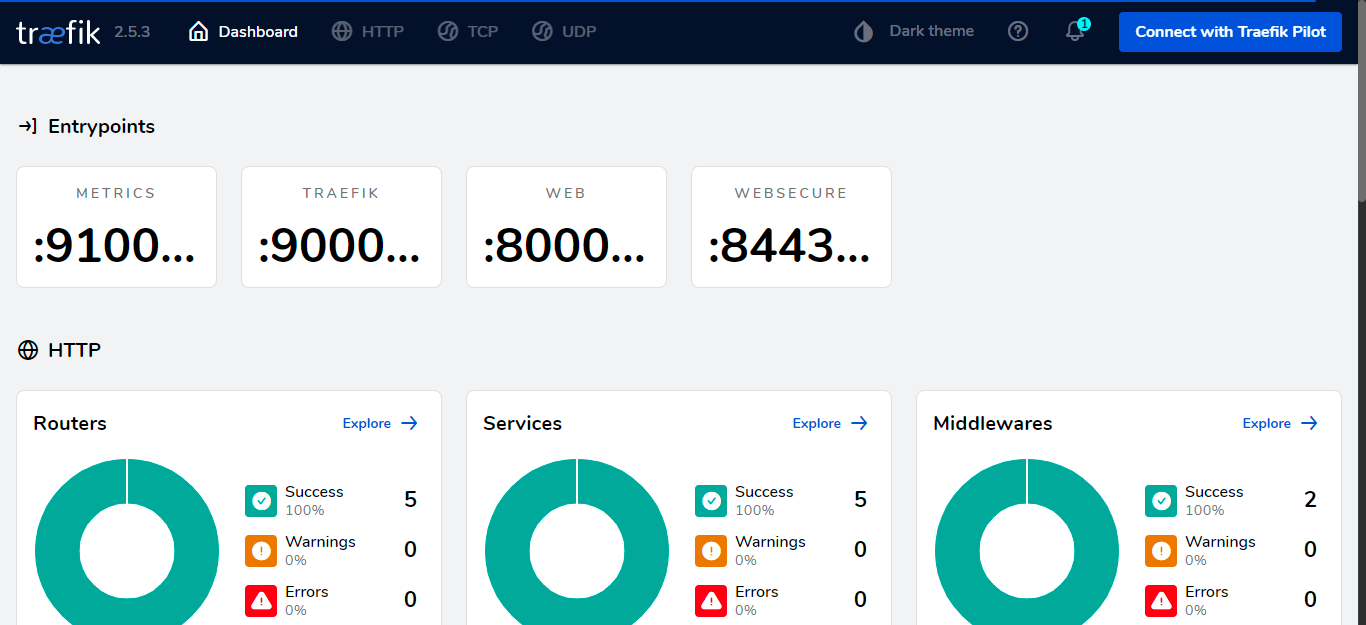
replicaset.apps/traefik-77ff894bb5 1 1 1 6m26s然后可以通过NodePort访问 Dashboard 页面,如下:
使用 Traefik
创建第一个路由规则
我们上面访问 Dashboard 是采用的NodePort的方式,既然已经把Traefik部署好了,为什么不使用路由网关的方式呢?
下面我们就来创建第一个路由网关来访问Dashboard。
Traefik 创建路由规则有多种方式,比如:
- 原生 Ingress 写法
- 使用 CRD IngressRoute 方式
- 使用 GatewayAPI 的方式
这里暂时介绍前面两种方式,关于 GatewayAPI 的方式在后续进行介绍。
原生 Ingress 路由规则
原生 Ingress 的路由规则,写法就比较简单,如下。
yaml
# cat traefik-ingress.yaml
apiVersion: networking.k8s.io/v1
kind: Ingress
metadata:
  name: traefik-dashboard-ingress
  annotations:
    kubernetes.io/ingress.class: traefik
    traefik.ingress.kubernetes.io/router.entrypoints: web
spec:
  rules:
    - host: traefik-web.coolops.cn
      http:
        paths:
          - pathType: Prefix
            path: /
            backend:
              service:
                name: traefik
                port:
number: 9000创建路由规则,命令如下:
yaml
# kubectl apply -f traefik-ingress.yaml -n traefik-ingress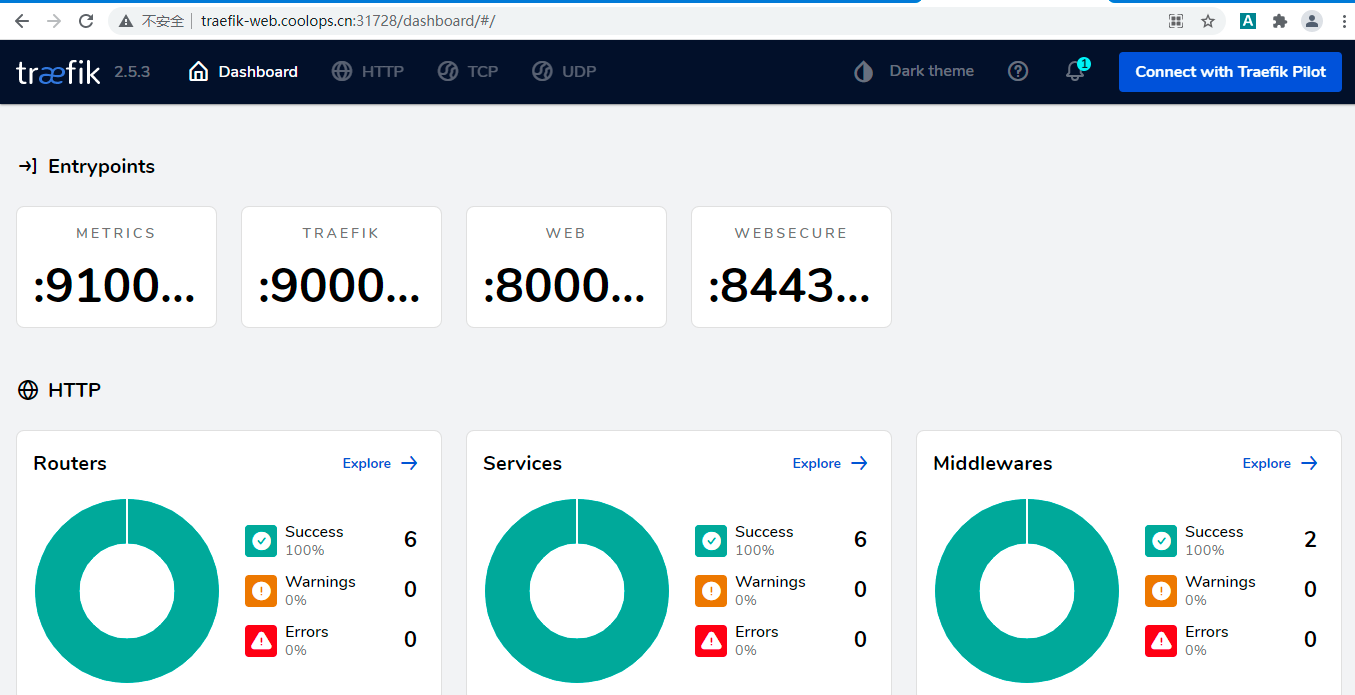
ingress.networking.k8s.io/traefik-dashboard-ingress created现在就可以通过域名http://traefik-web.coolops.cn:31728/dashboard/#/ 进行访问了(31728 是 80 端口的映射端口),如下:
使用 CRD 方式配置路由规则
在早期版本,Traefik 仅提供 kubernetes ingress 方式配置路由规则,社区认为采用开发一个自定义 CRD 的类型能够更好的提供 Kubernetes 的访问配置【3】。
IngressRoute的配置方式也比较简单,如下:
yaml
# cat traefik-ingressRoute.yaml
apiVersion: traefik.containo.us/v1alpha1
kind: IngressRoute
metadata:
  name: traefik-dashboard-route
spec:
  entryPoints:
    - web
  routes:
    - match: Host(`traefik-web2.coolops.cn`)
      kind: Rule
      services:
        - name: traefik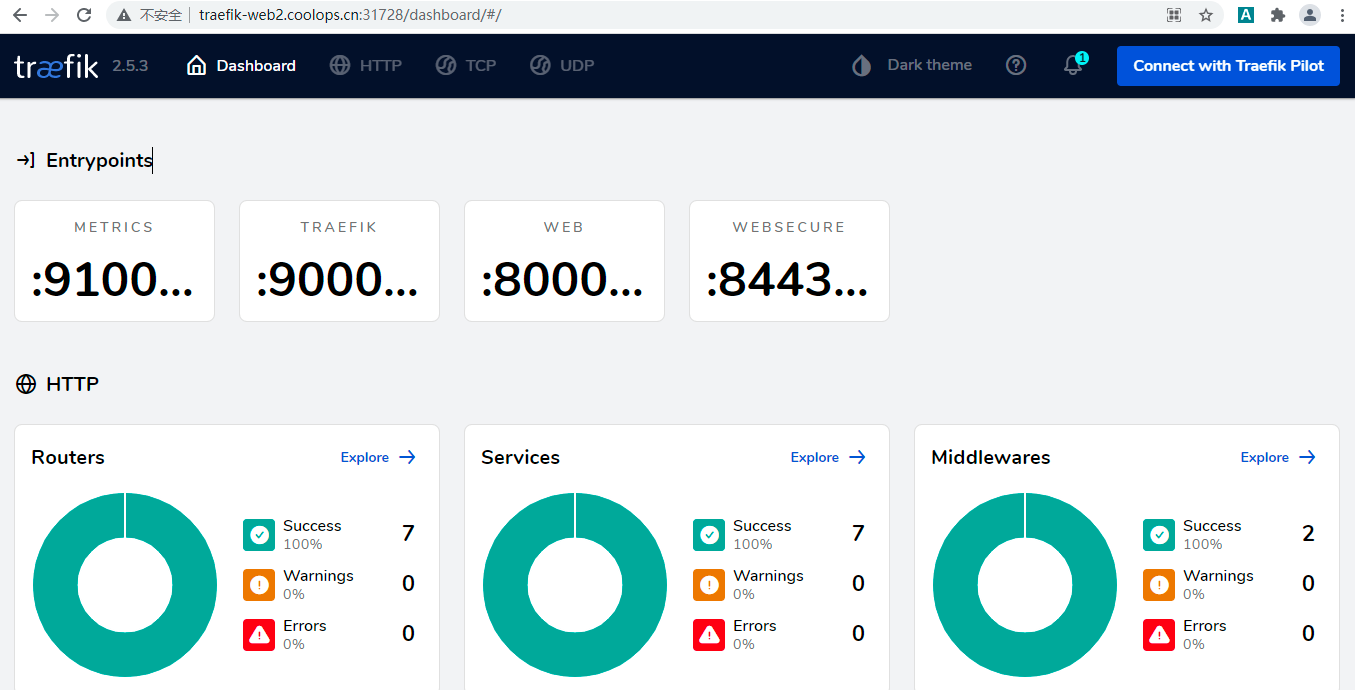
port: 9000部署命令如下:
bash
# kubectl apply -f traefik-ingressRoute.yaml -n traefik-ingress
ingressroute.traefik.containo.us/traefik-dashboard-route created然后就可以通过http://traefik-web2.coolops.cn:31728/dashboard/#/ 进行访问了。
暴露 HTTP 服务
首先,部署一个简单的whoami[4]应用,YAML 文件如下:
yaml
---
apiVersion: v1
kind: Pod
metadata:
  name: whoami
  labels:
    app: whoami
spec:
  containers:
    - name: whoami
      image: traefik/whoami:latest
      ports:
        - containerPort: 80
---
apiVersion: v1
kind: Service
metadata:
  name: whoami
spec:
  ports:
    - port: 80
      protocol: TCP
      targetPort: 80
  selector:
    app: whoami
type: ClusterIP部署成功后,创建一个路由规则,使外部可以访问。
yaml
# cat ingressroute.yaml
apiVersion: traefik.containo.us/v1alpha1
kind: IngressRoute
metadata:
  name: whoami-route
spec:
  entryPoints:
    - web
  routes:
    - match: Host(`whoami.coolops.cn`)
      kind: Rule
      services:
        - name: whoami
port: 80创建过后,就可以进行访问了,如下:

暴露 HTTPS 服务
上面的whoami应用,是通过HTTP进行访问的,如果要通过HTTPS进行访问,应该如何配置呢?
Traefik支持 HTTPS 和 TLS,对于证书可以选择自有证书,也可以使用Let's Encrypt【5】自动生成证书。这里会分别介绍这两种方式。
自有证书配置 HTTPS
现在公司基本都会自己购买更安全的证书,那对于自有证书配置 HTTPS 就会使用更加频繁,这里主要介绍这种配置方式。
1、申请或者购买证书
我这里是在腾讯云申请的免费证书。

然后下载对应的证书,并上传到服务器上。
2、将证书文件保存为 Secret
yaml
# kubectl create secret tls whoami-tls --cert=1_whoami.coolops.cn_bundle.crt --key=2_whoami.coolops.cn.key3、创建 IngressRoute 对象,使其可以通过 TLS 访问
yaml
# cat ingressroutetls.yaml
apiVersion: traefik.containo.us/v1alpha1
kind: IngressRoute
metadata:
  name: whoami-route-tls
spec:
  entryPoints:
    - websecure
  routes:
    - match: Host(`whoami.coolops.cn`)
      kind: Rule
      services:
        - name: whoami
          port: 80
  tls:
secretName: whoami-tls创建完成后,就可以通过https://whoami.coolops.cn:30358/ 进行访问了(30358 是 443 映射出来的端口)。

自动生成 HTTPS 证书
Traefik除了使用自有证书外,还支持Let's Encrypt自动生成证书【6】。
要使用Let's Encrypt自动生成证书,需要使用ACME。需要在静态配置中定义 "证书解析器",Traefik负责从ACME服务器中检索证书。
然后,每个 "路由器 "被配置为启用 TLS,并通过 tls.certresolver 配置选项与一个证书解析器关联。
Traefik的ACME验证方式主要有以下三种:
- tlsChallenge
- httpChallenge
- dnsChallenge
如果使用tlsChallenge,则要求Let's Encrypt 到 Traefik 443 端口必须是可达的。如果使用httpChallenge,则要求Let's Encrypt 到 Traefik 80 端口必须是可达的。如果使用dnsChallenge,则需要对应的providers[7]。
但是我们上面部署Traefik的时候并没有把 80 和 443 端口暴露出来,要测试tlsChallenge和httpChallenge的话就必须暴露,下面我们更改一下my-value.yaml,如下:
yaml
service:
  type: NodePort

ingressRoute:
  dashboard:
    enabled: false
ports:
  traefik:
    port: 9000
    expose: true
  web:
    port: 8000
    hostPort: 80
    expose: true
  websecure:
    port: 8443
    hostPort: 443
    expose: true
persistence:
  enabled: true
  name: data
  accessMode: ReadWriteOnce
  size: 5G
  storageClass: "openebs-hostpath"
  path: /data
additionalArguments:
  - "--serversTransport.insecureSkipVerify=true"
  - "--api.insecure=true"
- "--api.dashboard=true"然后重新更新一下Traefik,命令如下:
bash
helm upgrade traefik -n traefik-ingress -f my-value.yaml .现在我们就可以直接通过 80 或 443 端口进行访问了。
1、tlsChallenge
上面已经介绍过,要使用tlsChallenge,必须能访问入口的 443 端口,现在我们入口已经放开,接下来就修改Traefik的my-value.yaml配置,如下:
yaml
......
deployment:
  initContainers:
    - name: volume-permissions
      image: busybox:1.31.1
      command: ["sh", "-c", "chmod -Rv 600 /data/*"]
      volumeMounts:
        - name: data
          mountPath: /data
additionalArguments:
  - "--serversTransport.insecureSkipVerify=true"
  - "--api.insecure=true"
  - "--api.dashboard=true"
  - "--certificatesresolvers.coolops.acme.email=coolops@163.com"
  - "--certificatesresolvers.coolops.acme.storage=/data/acme.json"
- "--certificatesresolvers.coolops.acme.tlschallenge=true"PS:这里需要将/data 目录权限给更改一下,默认是 0660,权限太大是不允许的。
然后我们创建一个ingressRoute,如下:
yaml
# cat ingressrouteautotls.yaml
apiVersion: traefik.containo.us/v1alpha1
kind: IngressRoute
metadata:
name: whoami-route-auto-tls
spec:
entryPoints:
- websecure
routes:
- match: Host(`whoami3.coolops.cn`)
kind: Rule
services:
- name: whoami
port: 80
tls:
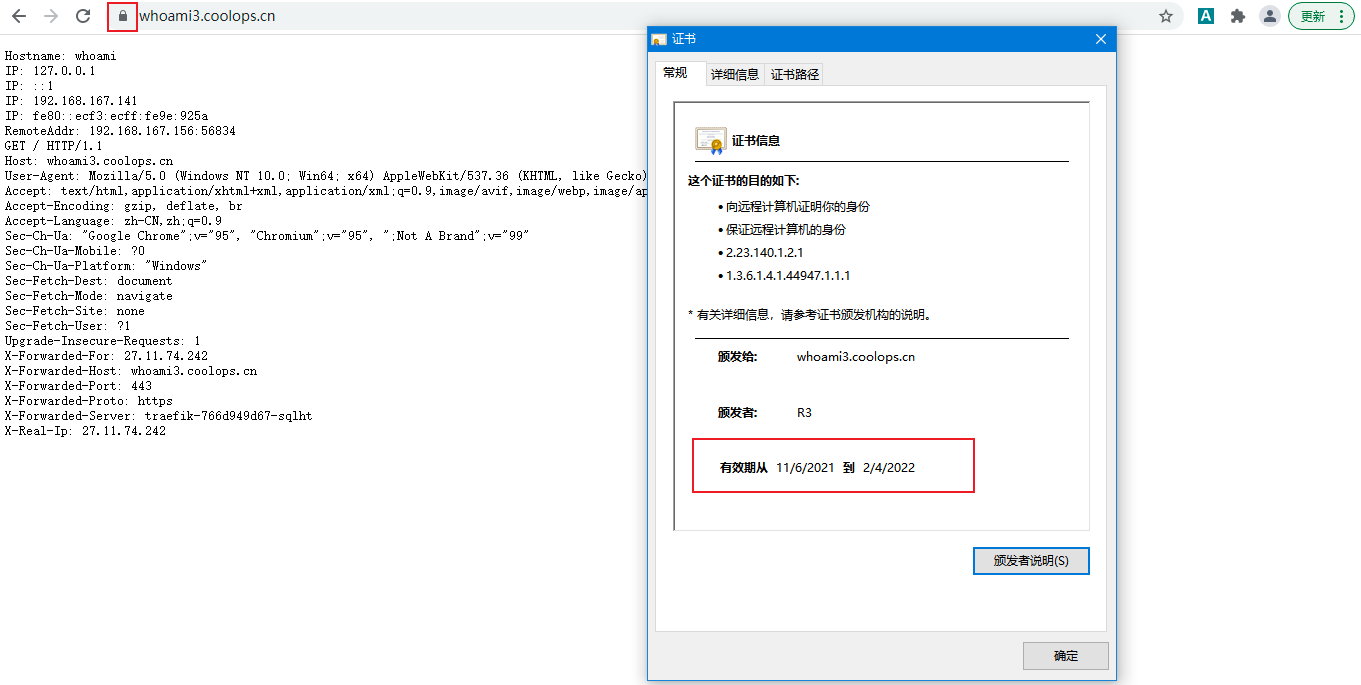
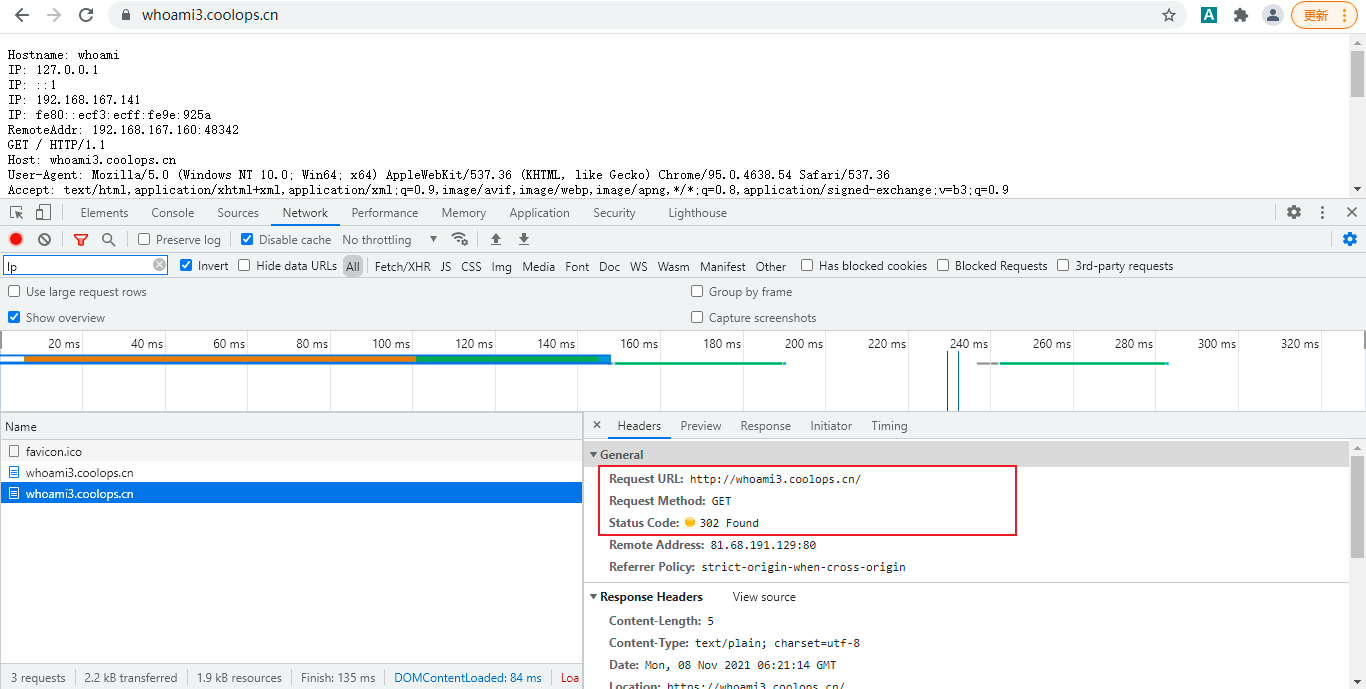
certResolver: coolops这时候我们访问https://whoami3.coolops.cn是可以正常使用证书的,如下:
2、httpChallenge
下面再使用httpChallenge进行测试,修改my-value.yaml配置文件如下:
yaml
......
deployment:
  initContainers:
    - name: volume-permissions
      image: busybox:1.31.1
      command: ["sh", "-c", "chmod -Rv 600 /data/*"]
      volumeMounts:
        - name: data
          mountPath: /data
additionalArguments:
  - "--serversTransport.insecureSkipVerify=true"
  - "--api.insecure=true"
  - "--api.dashboard=true"
  - "--certificatesresolvers.coolops.acme.email=coolops@163.com"
  - "--certificatesresolvers.coolops.acme.storage=/data/acme.json"
  - "--certificatesresolvers.coolops.acme.httpchallenge=true"
- "--certificatesresolvers.coolops.acme.httpchallenge.entrypoint=web"更新Traefik过后,然后再创建一个ingressRoute进行测试,YAML 文件如下:
yaml
apiVersion: traefik.containo.us/v1alpha1
kind: IngressRoute
metadata:
  name: whoami-route-auto-tls-http
spec:
  entryPoints:
    - websecure
  routes:
    - match: Host(`whoami4.coolops.cn`)
      kind: Rule
      services:
        - name: whoami
          port: 80
  tls: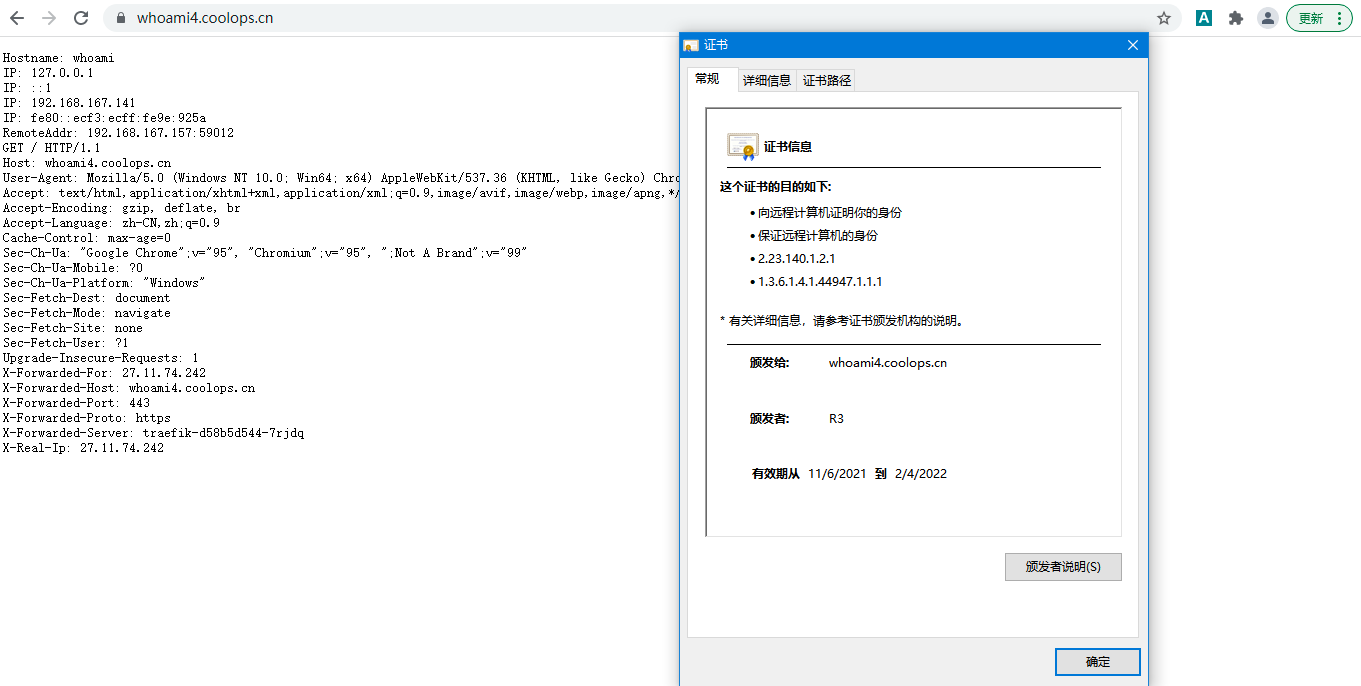
certResolver: coolops然后使用https://whoami4.coolops.cn,效果如下:
3、dnsChallenge
dnsChallenge在使用上相对比较麻烦,因为需要配置对应的provider,不过它可以生成通配符证书,这里以阿里云 DNS【8】为例。
使用阿里 DNS 的前提是您的域名是在阿里云上面,不然在签署证书的时候会报错,如下:
yaml
Unable to obtain ACME certificate for domains \"*.coolops.cn\" : unable to generate a certificate for the domains [*.coolops.cn]: error: one or more domains had a problem:\n[*.coolops.cn] [*.coolops.cn] acme: error presenting token: alicloud: zone coolops.cn. not found in AliDNS for domain coolops.cn\n" providerName=coolops.acme使用阿里云的 DNS 校验需要配置 3 个环境变量:ALICLOUD_ACCESS_KEY、ALICLOUD_SECRET_KEY、ALICLOUD_REGION_ID,分别对应我们平时开发阿里云应用的时候的密钥,可以登录阿里云后台获取,由于这是比较私密的信息,所以我们用 Secret 对象来创建:
yaml
$ kubectl create secret generic traefik-alidns --from-literal=ALICLOUD_ACCESS_KEY=<aliyun ak> --from-literal=ALICLOUD_SECRET_KEY=<aliyun sk>--from-literal=ALICLOUD_REGION_ID=cn-beijing -n traefik-ingress修改 Traefik 的 my-value.yaml,如下:
yaml
......
additionalArguments:
  - "--serversTransport.insecureSkipVerify=true"
  - "--api.insecure=true"
  - "--api.dashboard=true"
  - "--certificatesresolvers.coolops.acme.email=coolops@163.com"
  - "--certificatesresolvers.coolops.acme.storage=/data/acme.json"
  - "--certificatesresolvers.coolops.acme.dnschallenge=true"
  - "--certificatesResolvers.coolops.acme.dnsChallenge.provider=alidns"
envFrom:
  - secretRef:
name: traefik-alidns更新Traefik过后,然后再创建一个ingressRoute进行测试,YAML 文件如下(由于 coolops.cn 不在阿里云上,所以换了一个域名):
yaml
apiVersion: traefik.containo.us/v1alpha1
kind: IngressRoute
metadata:
  name: whoami-route-auto-tls-dns
spec:
  entryPoints:
    - websecure
  routes:
    - match: Host(`whoami6.coolops.cn`)
      kind: Rule
      services:
        - name: whoami
          port: 80
  tls:
    certResolver: coolops
    domains: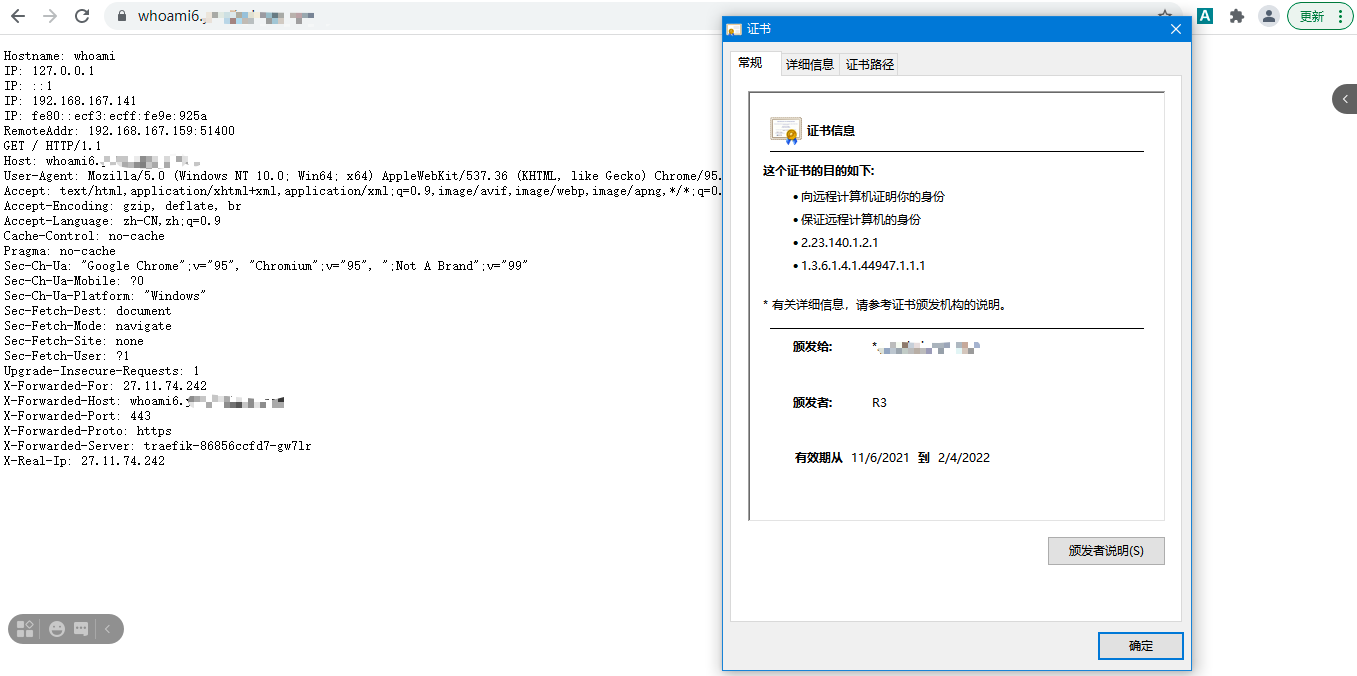
- main: "*.coolops.cn"然后访问域名后,就可以看到证书签署 成功,如下:
中间件的使用
在介绍Traefik的核心概念的时候有提到一个请求匹配Rules后,会经过一系列的Middleware,再到具体的Services上。这个Middleware是什么呢?

Middleware是Traefik 2.0之后新增的功能,用户可以根据不通的需求来选择不同的 Middleware 来满足服务,提高了定制化的能力。
Traefik 内置了很多不同功能的 Middleware,主要是针对 HTTP 和 TCP,HTTP 占大部分[9],这里挑选几个比较常用的进行演示。
强制跳转 HTTPS
强制跳转 HTTPS 是经常会配置的功能,这里还是以上没的whoami应用为例。
1、创建一个 HTTPS 的 ingressRoute
yaml
apiVersion: traefik.containo.us/v1alpha1
kind: IngressRoute
metadata:
  name: whoami-route-auto-tls
spec:
  entryPoints:
    - websecure
  routes:
    - match: Host(`whoami3.coolops.cn`)
      kind: Rule
      services:
        - name: whoami
          port: 80
  tls:
certResolver: coolops2、定义一个跳转 HTTPS 的中间件
这里会用到RedirectScheme的内置中间件,配置如下:
yaml
apiVersion: traefik.containo.us/v1alpha1
kind: Middleware
metadata:
  name: redirect-https-middleware
spec:
  redirectScheme:
scheme: https3、定义一个 HTTP 的 ingressRoute,并使用 Middleware
yaml
apiVersion: traefik.containo.us/v1alpha1
kind: IngressRoute
metadata:
  name: whoami3-route
spec:
  entryPoints:
    - web
  routes:
    - match: Host(`whoami3.coolops.cn`)
      kind: Rule
      services:
        - name: whoami
          port: 80
      middlewares:
- name: redirect-https-middleware然后访问http://whoami3.coolops.cn就会被强制跳转到https://whoami3.coolops.cn。
去除请求路径前缀
有时候会遇到这么一个需求:
- 只有一个域名
- 相通过这个域名访问不同的应用
这种需求是非常常见的,在NGINX中,我们可以配置多个Location来定制规则,使用Traefik也可以这么做。
但是定制不同的前缀后,由于应用本身并没有这些前缀,导致请求返回404,这时候我们就需要对请求的path进行处理,还是以whoami应用为例。
1、创建一个带前缀的 ingressRoute
yaml
apiVersion: traefik.containo.us/v1alpha1
kind: IngressRoute
metadata:
  name: whoami7-route
spec:
  entryPoints:
    - web
  routes:
    - match: Host(`whoami7.coolops.cn`) && PathPrefix('/coolops')
      kind: Rule
      services:
        - name: whoami
port: 80我们现在访问是会返回404状态的。

2、定义去除前缀的中间件
yaml
apiVersion: traefik.containo.us/v1alpha1
kind: Middleware
metadata:
  name: prefix-coolops-url-middleware
spec:
  stripPrefix:
    prefixes:
- /coolops3、修改上面的 ingressRoute,应用中间件
yaml
apiVersion: traefik.containo.us/v1alpha1
kind: IngressRoute
metadata:
  name: whoami7-route
spec:
  entryPoints:
    - web
  routes:
    - match: Host(`whoami7.coolops.cn`) && PathPrefix('/coolops')
      kind: Rule
      services:
        - name: whoami
          port: 80
      middlewares:
- name: prefix-coolops-url-middleware然后就可以正常访问了。
添加 IP 白名单
在工作中,有一些 URL 并不希望对外暴露,比如 prometheus、grafana 等的 url,这时候我们希望通过白名单 IP 来达到需求,就可以使用Traefik中的ipWhiteList中间件来完成。
1、定义白名单 IP 的中间件
yaml
apiVersion: traefik.containo.us/v1alpha1
kind: Middleware
metadata:
  name: ip-white-list-middleware
spec:
  ipWhiteList:
    sourceRange:
      - 127.0.0.1/32
- 192.168.100.180然后将中间件应用到对应的 Rules 上,就可以完成白名单功能。
除了上面的功能,Traefik 内置 Middleware 还支持很多其他功能,比如限流、认证鉴权等,可以通过引用【9】进行查看。
暴露 TCP 服务
Traefik 2.0 支持暴露 TCP,这里以 Redis 为例。
1、部署一个 Redis 服务
yaml
apiVersion: apps/v1
kind: Deployment
metadata:
  name: redis
spec:
  selector:
    matchLabels:
      app: redis
  template:
    metadata:
      labels:
        app: redis
    spec:
      containers:
        - name: redis
          image: redis:5.0.14
          ports:
            - containerPort: 6379
              protocol: TCP
---
apiVersion: v1
kind: Service
metadata:
  name: redis
spec:
  ports:
    - port: 6379
      targetPort: 6379
  selector:
app: redis2、暴露 Redis 端口
暴露 TCP 端口使用的是 SNI【10】,而 SNI 又是依赖 TLS 的,所以我们需要配置证书才行,但是如果没有证书的话,我们可以使用通配符*进行配置。
(1)、添加一个 redis 的 entrypoints
修改Traefik的部署文件my-value.yaml,添加如下内容:
yaml
ports:
  traefik:
    port: 9000
    expose: true
  web:
    port: 8000
    hostPort: 80
    expose: true
  websecure:
    port: 8443
    hostPort: 443
    expose: true
  redis:
    port: 6379
    containerPort: 6379
    hostPort: 6379
additionalArguments:
  - "--entryPoints.redis.address=:6379"
  - "--serversTransport.insecureSkipVerify=true"
  - "--api.insecure=true"
  - "--api.dashboard=true"
  - "--certificatesresolvers.coolops.acme.email=coolops@163.com"
  - "--certificatesresolvers.coolops.acme.storage=/data/acme.json"
  - "--certificatesresolvers.coolops.acme.httpchallenge=true"
- "--certificatesresolvers.coolops.acme.httpchallenge.entrypoint=web"在启动参数中添加--entryPoints.redis.address=:6379用来指定 entrypoint。
(2)、创建 ingressRoute 进行对外暴露
yaml
apiVersion: traefik.containo.us/v1alpha1
kind: IngressRouteTCP
metadata:
  name: redis-traefik-tcp
spec:
  entryPoints:
    - redis
  routes:
    - match: HostSNI(`*`)
      services:
        - name: redis
port: 6379然后可以使用客户端工具进行 Redis 的操作了。
yaml
# redis-cli -h redis.coolops.cn
redis.coolops.cn:6379> set  a b
OK
redis.coolops.cn:6379> get a
"b"
redis.coolops.cn:6379>灰度发布
Traefik2.0 以后的一个更强大的功能就是灰度发布,灰度发布我们有时候也会称为金丝雀发布(Canary),主要就是让一部分测试的服务也参与到线上去,经过测试观察看是否符号上线要求。
假设一个应用现在运行着V1版本,新的V2版本需要上线,这时候我们需要在集群中部署好V2版本,然后通过Traefik提供的带权重的轮询(WRR)来实现该功能。
1、部署 appv1、appv2 应用
appv1.yaml
yaml
---
apiVersion: apps/v1
kind: Deployment
metadata:
  name: appv1
spec:
  selector:
    matchLabels:
      app: appv1
  template:
    metadata:
      labels:
        use: test
        app: appv1
    spec:
      containers:
        - name: nginx
          image: nginx
          imagePullPolicy: IfNotPresent
          lifecycle:
            postStart:
              exec:
                command:
                  [
                    "/bin/sh",
                    "-c",
                    "echo Hello v1 > /usr/share/nginx/html/index.html",
                  ]
          ports:
            - containerPort: 80
              name: portv1

---
apiVersion: v1
kind: Service
metadata:
  name: appv1
spec:
  selector:
    app: appv1
  ports:
    - name: http
      port: 80
targetPort: portv1appv2.yaml
yaml
---
apiVersion: apps/v1
kind: Deployment
metadata:
  name: appv2
spec:
  selector:
    matchLabels:
      app: appv2
  template:
    metadata:
      labels:
        use: test
        app: appv2
    spec:
      containers:
        - name: nginx
          image: nginx
          imagePullPolicy: IfNotPresent
          lifecycle:
            postStart:
              exec:
                command:
                  [
                    "/bin/sh",
                    "-c",
                    "echo Hello v2 > /usr/share/nginx/html/index.html",
                  ]
          ports:
            - containerPort: 80
              name: portv2

---
apiVersion: v1
kind: Service
metadata:
  name: appv2
spec:
  selector:
    app: appv2
  ports:
    - name: http
      port: 80
targetPort: portv22、创建 TraefikService
在 Traefik2.1 以后新增了一个 TraefikService 的 CRD 资源,我们可以直接利用这个对象来配置 WRR。
yaml
apiVersion: traefik.containo.us/v1alpha1
kind: TraefikService
metadata:
  name: app-wrr
spec:
  weighted:
    services:
      - name: appv1
        weight: 3
        port: 80
        kind: Service
      - name: appv2
        weight: 1
        port: 80
kind: Service3、创建 ingressRoute
yaml
apiVersion: traefik.containo.us/v1alpha1
kind: IngressRoute
metadata:
  name: app-ingressroute-canary
spec:
  entryPoints:
    - web
  routes:
    - match: Host(`app.coolops.cn`)
      kind: Rule
      services:
        - name: app-wrr
kind: TraefikService注意:这里配置的不是Service类型,而是TraefikService。
然后就可以通过访问http://app.coolops.cn来校验结果。
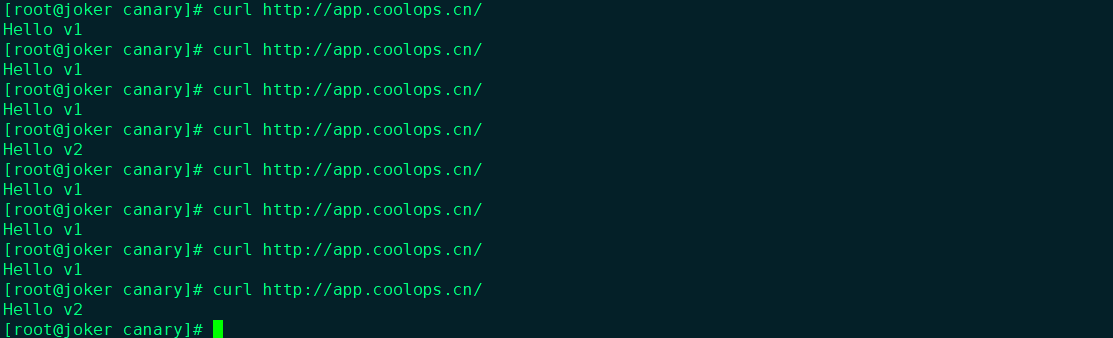
待V2测试没问题后,就可以将流量全切到V2了。
流量复制
在Traefik 2.0之后还引入了镜像服务[11],它可以将请求的流量按规则复制一份发送给其他服务,并且会忽略这部分请求的响应。
这个功能在做一些压测或者问题复现的时候还是很有用。
这里依然以上没的 appv1 和 appv2 为例进行简单的演示。
1、创建 TraefikService,定义复制规则
yaml
apiVersion: traefik.containo.us/v1alpha1
kind: TraefikService
metadata:
  name: app-mirror
spec:
  mirroring:
    name: appv1
    port: 80
    mirrors:
      - name: appv2
        percent: 50
port: 80上面定义的意思是将请求到 appv1 的 50%请求复制到 appv2。
2、创建 ingressRoute,进行效果演示
yaml
apiVersion: traefik.containo.us/v1alpha1
kind: IngressRoute
metadata:
  name: app-ingressroute-mirror
spec:
  entryPoints:
    - web
  routes:
    - match: Host(`mirror.coolops.cn`)
      kind: Rule
      services:
        - name: app-mirror
kind: TraefikService然后进行测试,效果如下:
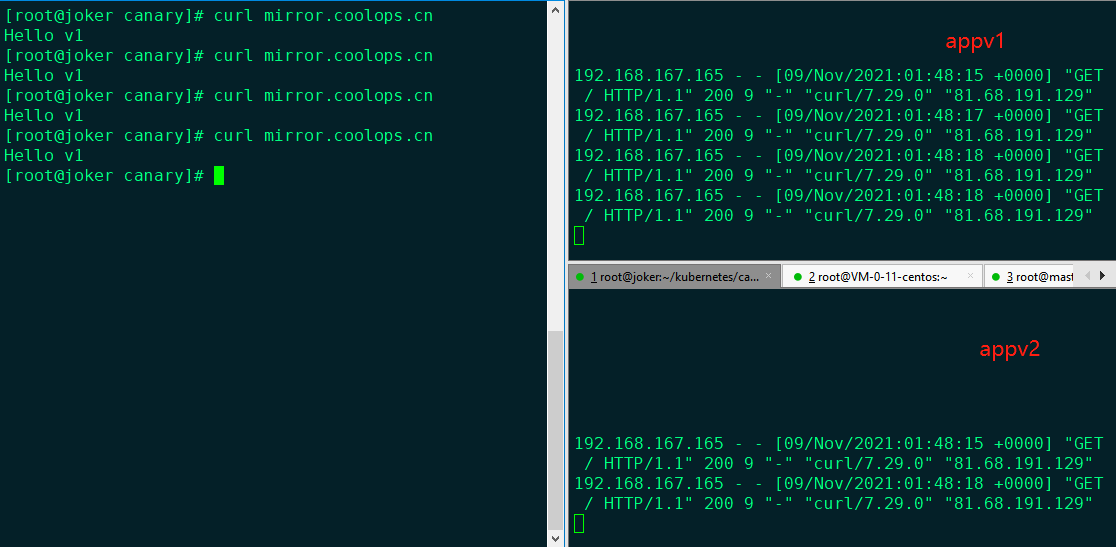
发了 4 次请求,appv1 可以正常接收 4 次请求,appv2 可以收到 2 次请求,收到的响应是 appv1 的,并没有 appv2 的响应。
Kubernetes Gateway API
我们在上面创建路由规则要么使用ingress,要么使用ingressRoute,其实在Traefik 2.4以后支持Kubernetes Gateway API[12]提供的CRD方式创建路由规则。
什么是 Gateway API?
Gateway API【13】是一个由SIG-NETWORK社区管理的开源项目。它是Kubernetes中服务网络模型的资源集合。这些资源(GatewayClass、Gateway、HTTPRoute、TCPRoute、Service)旨在通过表达式的、可扩展的和面向角色的接口来发展 Kubernetes 服务网络,这些接口由许多供应商实现,并得到了广泛的行业支持。
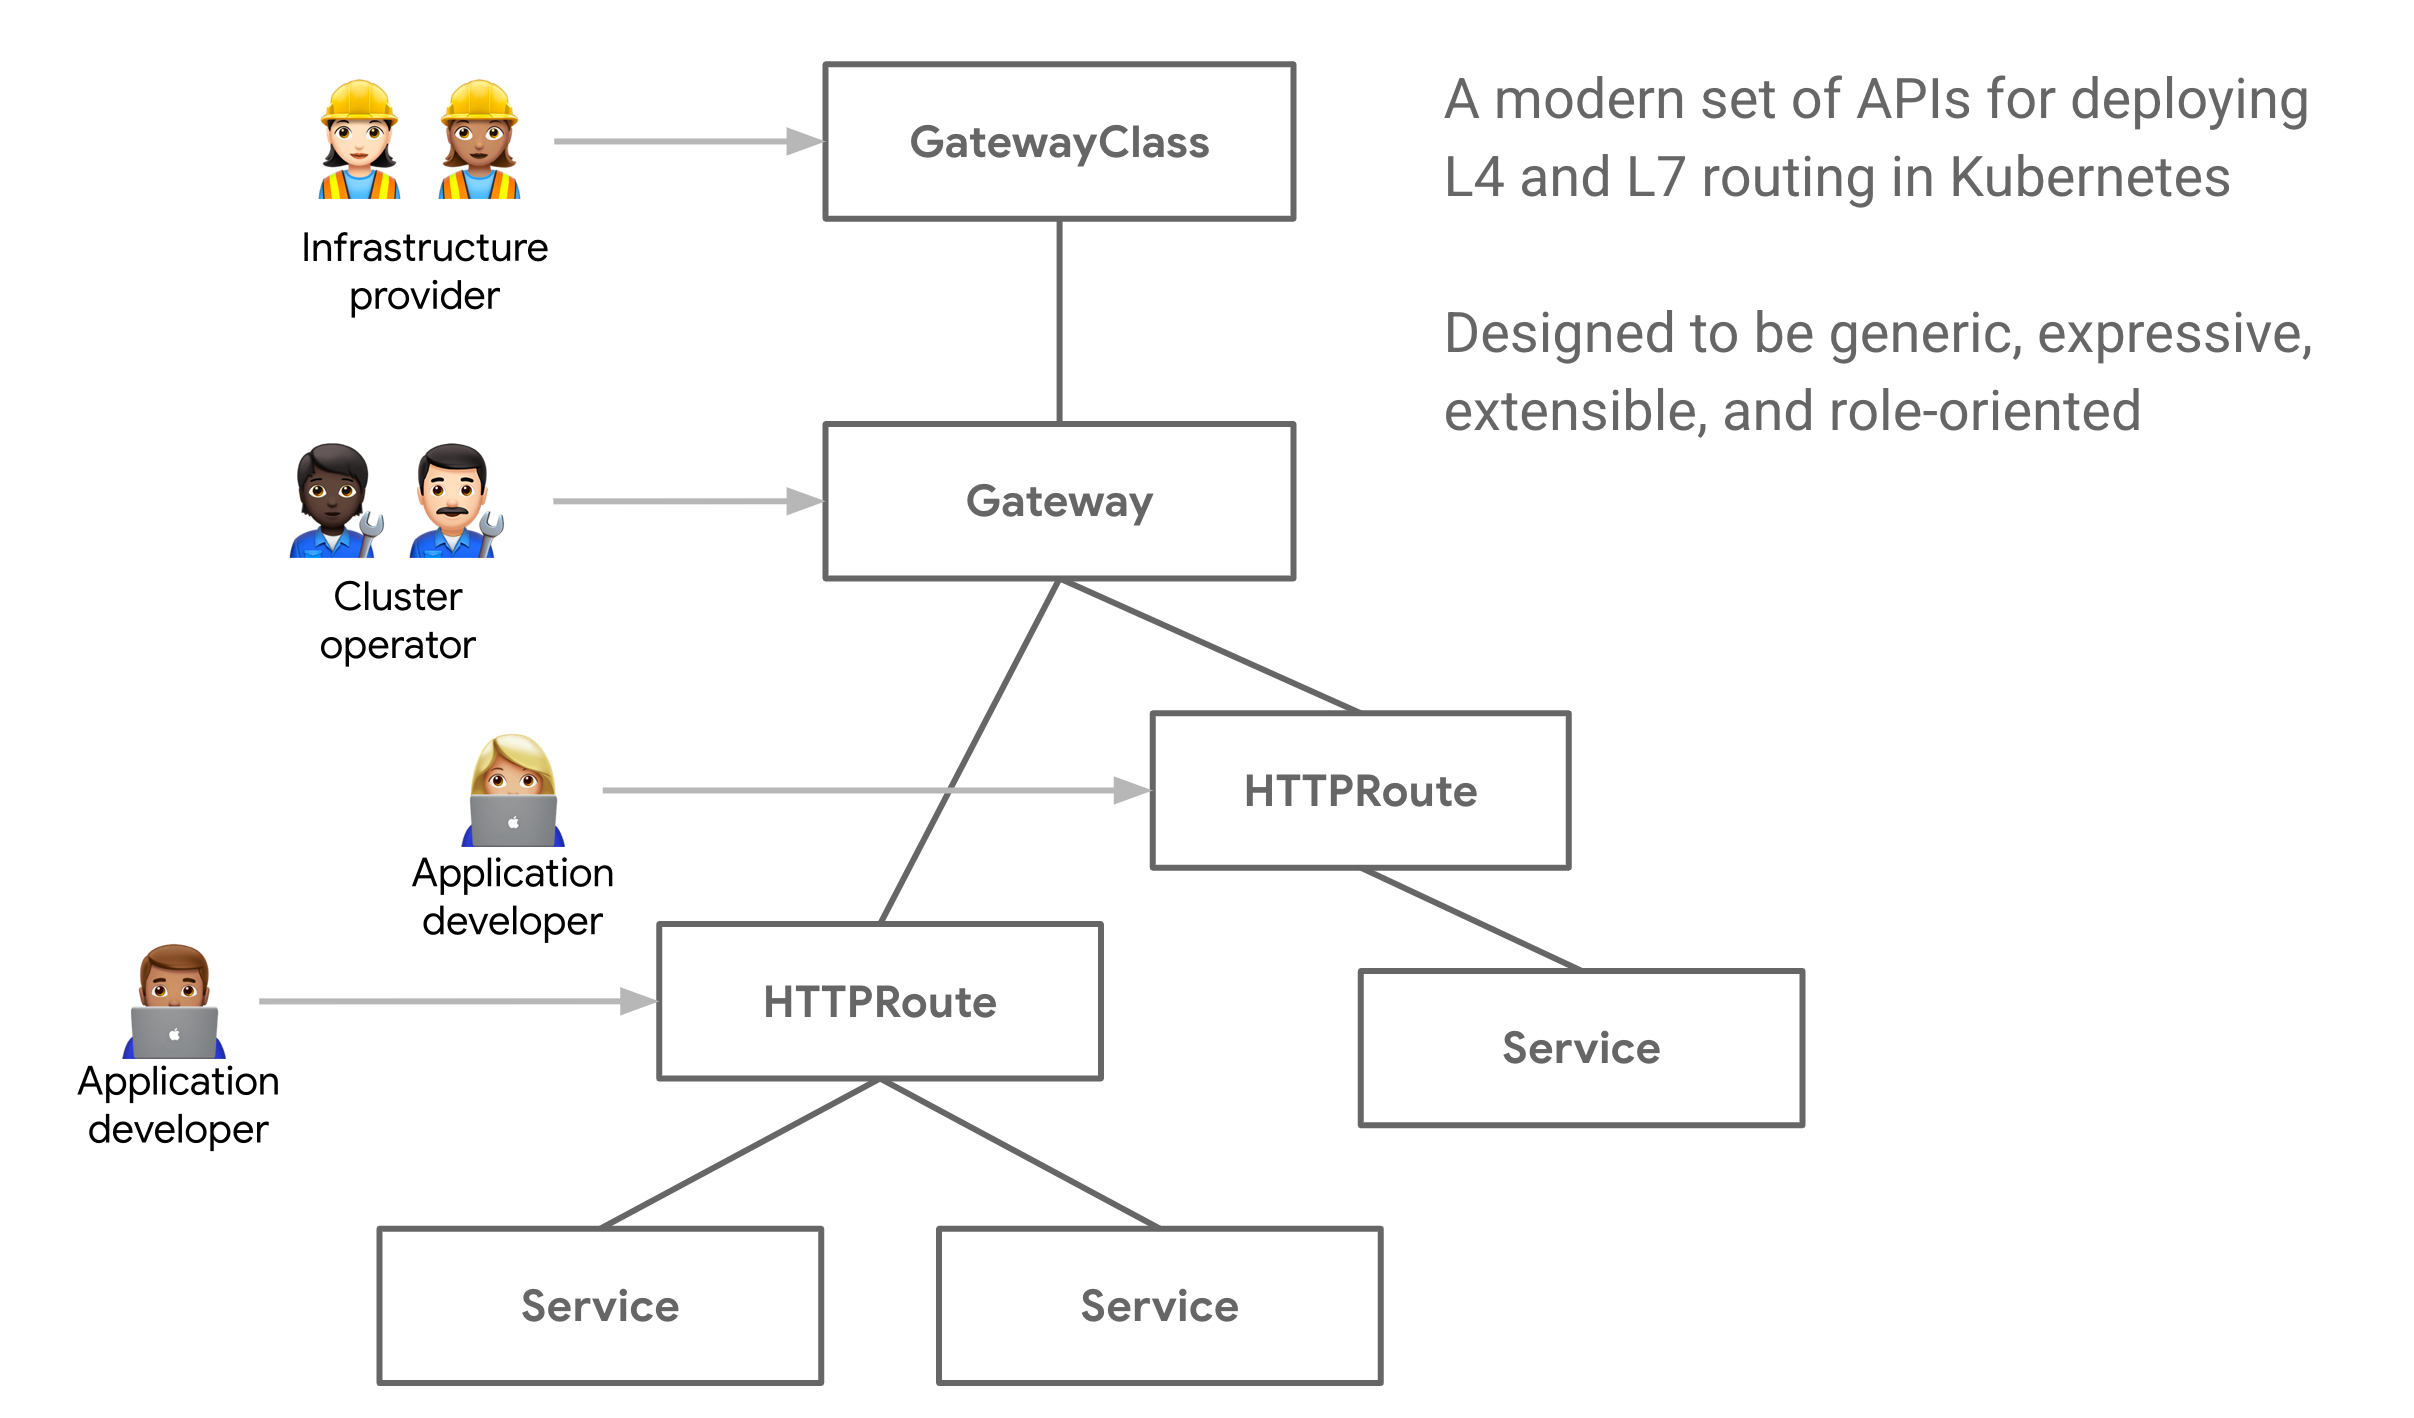
- GatewayClass: GatewayClass 是基础结构提供程序定义的群集范围的资源。此资源表示可以实例化的网关类。一般该资源是用于支持多个基础设施提供商用途的,这里我们只部署一个即可。
- Gateway: Gateway 与基础设施配置的生命周期是 1:1。当用户创建网关时,GatewayClass 控制器会提供或配置一些负载平衡基础设施。
- HTTPRoute: HTTPRoute 是一种网关 API 类型,用于指定 HTTP 请求从网关侦听器到 API 对象(即服务)的路由行为。
使用 Gateway API
1、安装 Gateway API 的 CRD
Traefik Gateway provider 仅支持 v0.3.0 (v1alpha1).
yaml
kubectl kustomize "github.com/kubernetes-sigs/gateway-api/config/crd?ref=v0.3.0" \
| kubectl apply -f -2、创建 rbac,给 traefik 授权
yaml
---
apiVersion: rbac.authorization.k8s.io/v1
kind: ClusterRole
metadata:
  name: gateway-role
rules:
  - apiGroups:
      - ""
    resources:
      - services
      - endpoints
      - secrets
    verbs:
      - get
      - list
      - watch
  - apiGroups:
      - networking.x-k8s.io
    resources:
      - gatewayclasses
      - gateways
      - httproutes
      - tcproutes
      - tlsroutes
    verbs:
      - get
      - list
      - watch
  - apiGroups:
      - networking.x-k8s.io
    resources:
      - gatewayclasses/status
      - gateways/status
      - httproutes/status
      - tcproutes/status
      - tlsroutes/status
    verbs:
      - update

---
apiVersion: rbac.authorization.k8s.io/v1
kind: ClusterRoleBinding
metadata:
  name: gateway-controller

roleRef:
  apiGroup: rbac.authorization.k8s.io
  kind: ClusterRole
  name: gateway-role
subjects:
  - kind: ServiceAccount
    name: traefik
namespace: traefik-ingress2、Traefik 开启 gateway api 支持
修改my-value.yaml 文件,如下:
yaml
......
additionalArguments:
  - "--entryPoints.redis.address=:6379"
  - "--serversTransport.insecureSkipVerify=true"
  - "--api.insecure=true"
  - "--api.dashboard=true"
  - "--certificatesresolvers.coolops.acme.email=coolops@163.com"
  - "--certificatesresolvers.coolops.acme.storage=/data/acme.json"
  - "--certificatesresolvers.coolops.acme.httpchallenge=true"
  - "--certificatesresolvers.coolops.acme.httpchallenge.entrypoint=web"
  - "--experimental.kubernetesgateway"
- "--providers.kubernetesgateway"更新 Traefik,命令如下:
yaml
helm upgrade traefik -n traefik-ingress -f my-value.yaml .4、通过 Gateway api 的方式暴露 traefik dashboard 应用
(1)、创建 GatewayClass
yaml
apiVersion: networking.x-k8s.io/v1alpha1
kind: GatewayClass
metadata:
  name: traefik
spec:
controller: traefik.io/gateway-controller(2)、创建 gateway
yaml
apiVersion: networking.x-k8s.io/v1alpha1
kind: Gateway
metadata:
  name: http-gateway
  namespace: traefik-ingress
spec:
  gatewayClassName: traefik
  listeners:
    - protocol: HTTP
      port: 8000
      routes:
        kind: HTTPRoute
        namespaces:
          from: All
        selector:
          matchLabels:
app: traefik(3)、创建 HTTPRoute
yaml
apiVersion: networking.x-k8s.io/v1alpha1
kind: HTTPRoute
metadata:
  name: whoami-gateway-api-route
  namespace: traefik-ingress
  labels:
    app: traefik
spec:
  hostnames:
    - "traefik1.coolops.cn"
  rules:
    - matches:
        - path:
            type: Prefix
            value: /
      forwardTo:
        - serviceName: traefik
          port: 9000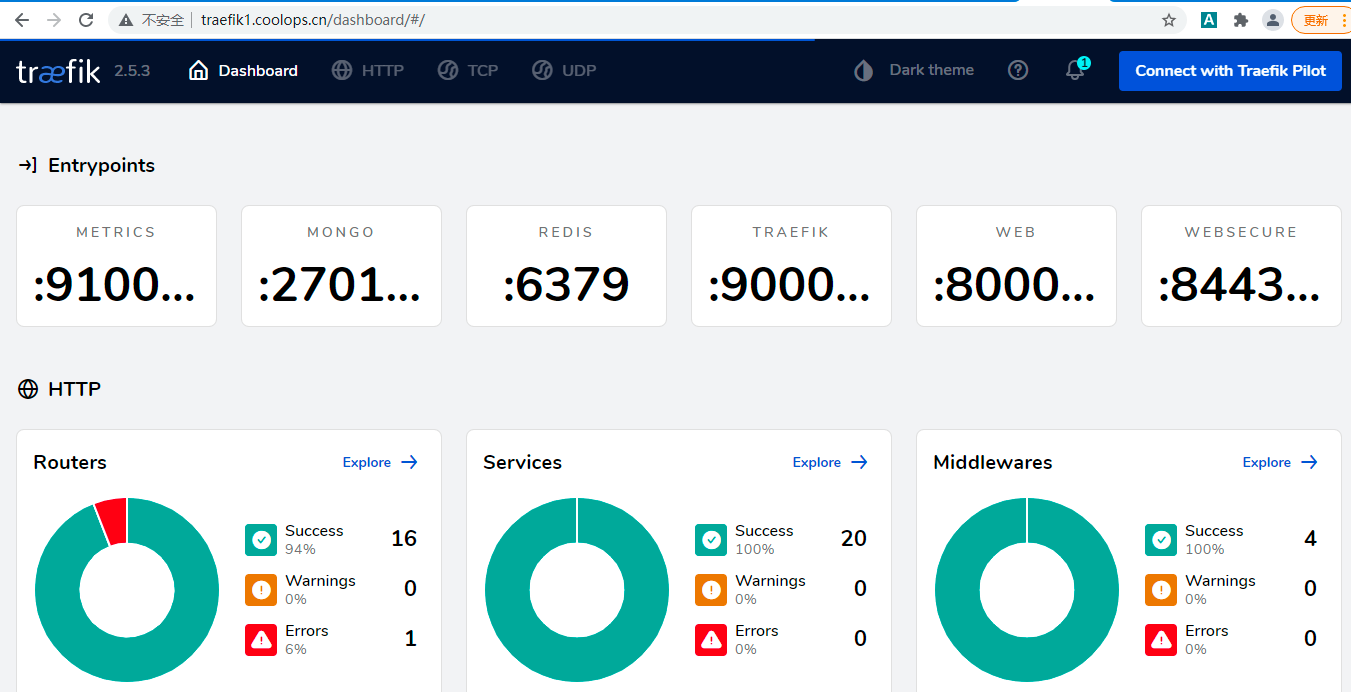
weight: 1(4)、现在就可以直接在浏览器访问了
GatewayClass在集群中可以只创建一个,然后Gateway和HTTPRoute是需要对应的。
比如我这里要暴露 default 命名空间下的 whoami 应用,YAML 就应该如下:
yaml
apiVersion: networking.x-k8s.io/v1alpha1
kind: Gateway
metadata:
  name: http-gateway
spec:
  gatewayClassName: traefik
  listeners:
    - protocol: HTTP
      port: 8000
      routes:
        kind: HTTPRoute
        namespaces:
          from: All
        selector:
          matchLabels:
            app: whoami
---
apiVersion: networking.x-k8s.io/v1alpha1
kind: HTTPRoute
metadata:
  name: whoami-gateway-api-route
  labels:
    app: whoami
spec:
  hostnames:
    - "whoami8.coolops.cn"
  rules:
    - matches:
        - path:
            type: Prefix
            value: /
      forwardTo:
        - serviceName: whoami
          port: 80
weight: 1最后
Traefik是一个功能比较强大的边缘网关,基本能满足绝大部分的场景需求,而且还有Mesh等工具,比较好用,有兴趣的朋友可以到官网[14]进行学习,也欢迎交流。
引用
[1] https://doc.traefik.io/traefik/
[2] https://github.com/traefik/traefik-helm-chart/blob/master/traefik/values.yaml
[3] https://doc.traefik.io/traefik/providers/kubernetes-crd/
[4] https://github.com/traefik/whoami
[5] https://letsencrypt.org/zh-cn/
[6] https://doc.traefik.io/traefik/https/acme/
[7] https://doc.traefik.io/traefik/https/acme/#tlschallenge
[8] https://go-acme.github.io/lego/dns/alidns/
[9] https://doc.traefik.io/traefik/middlewares/http/overview/
[10] https://doc.traefik.io/traefik/routing/routers/#configuring-tcp-routers
[11] https://doc.traefik.io/traefik/routing/services/#mirroring-service
[12] https://doc.traefik.io/traefik/providers/kubernetes-gateway/
[13] https://gateway-api.sigs.k8s.io/
[14] https://traefik.io/