 Tekton系列之实践篇-Tekton和Argocd的梦幻联动
前面的一系列文章基本已经把 Tekton 相关的知识介绍完了,如果你认真的看完并且实践过,相信你对 Tekton 已经有一定的掌握了。
在实际的工作中,Tekton 可以完成 CICD 的所有工作,并没有强制的将它划分为 CI 工具或者 CD 工具。在今天的文章中,我们就会将 CI 和 CD 进行分开,让 Tekton 专注于 CI,CD 则交给 Argocd。
要使用 Tekton+Argocd 模式,只需要把我们之前 deploy 的 task 变成由 Argocd 完成即可。而原先的 deploy 的 task 改成更改镜像信息并推送到 Gitlab。
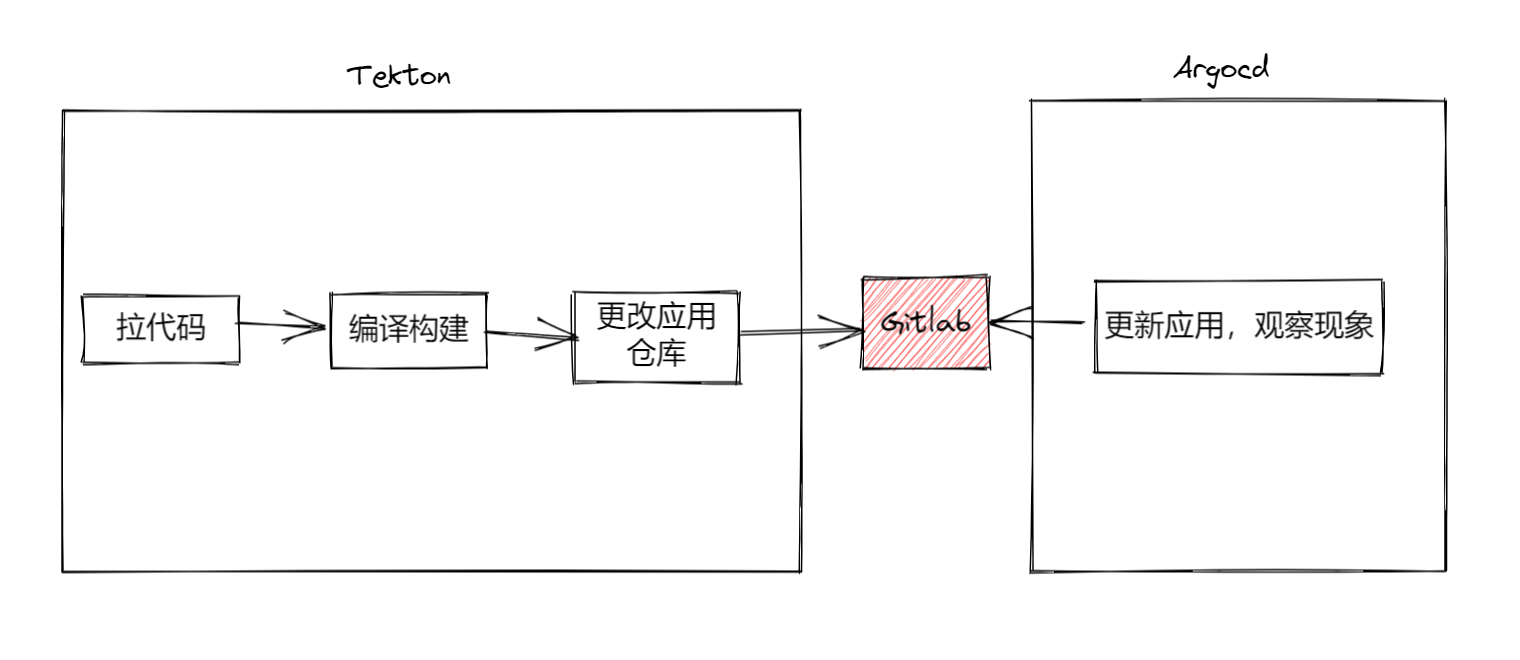
所以整体步骤变成如下:
- 拉代码
- 编译构建,构建镜像并推送
- 更改 helm chart 的 value.yaml 中的镜像信息,推送到仓库
- argocd 监控到 chart 仓库变化,更新应用
前提:自己部署好 Argocd,如果对 Argocd 不熟悉可以到官网(https://argo-cd.readthedocs.io/en/stable/ (opens new window))进行学习,也可以在《运维开发故事》公众号搜索 Argocd 相关文章进行学习。
#
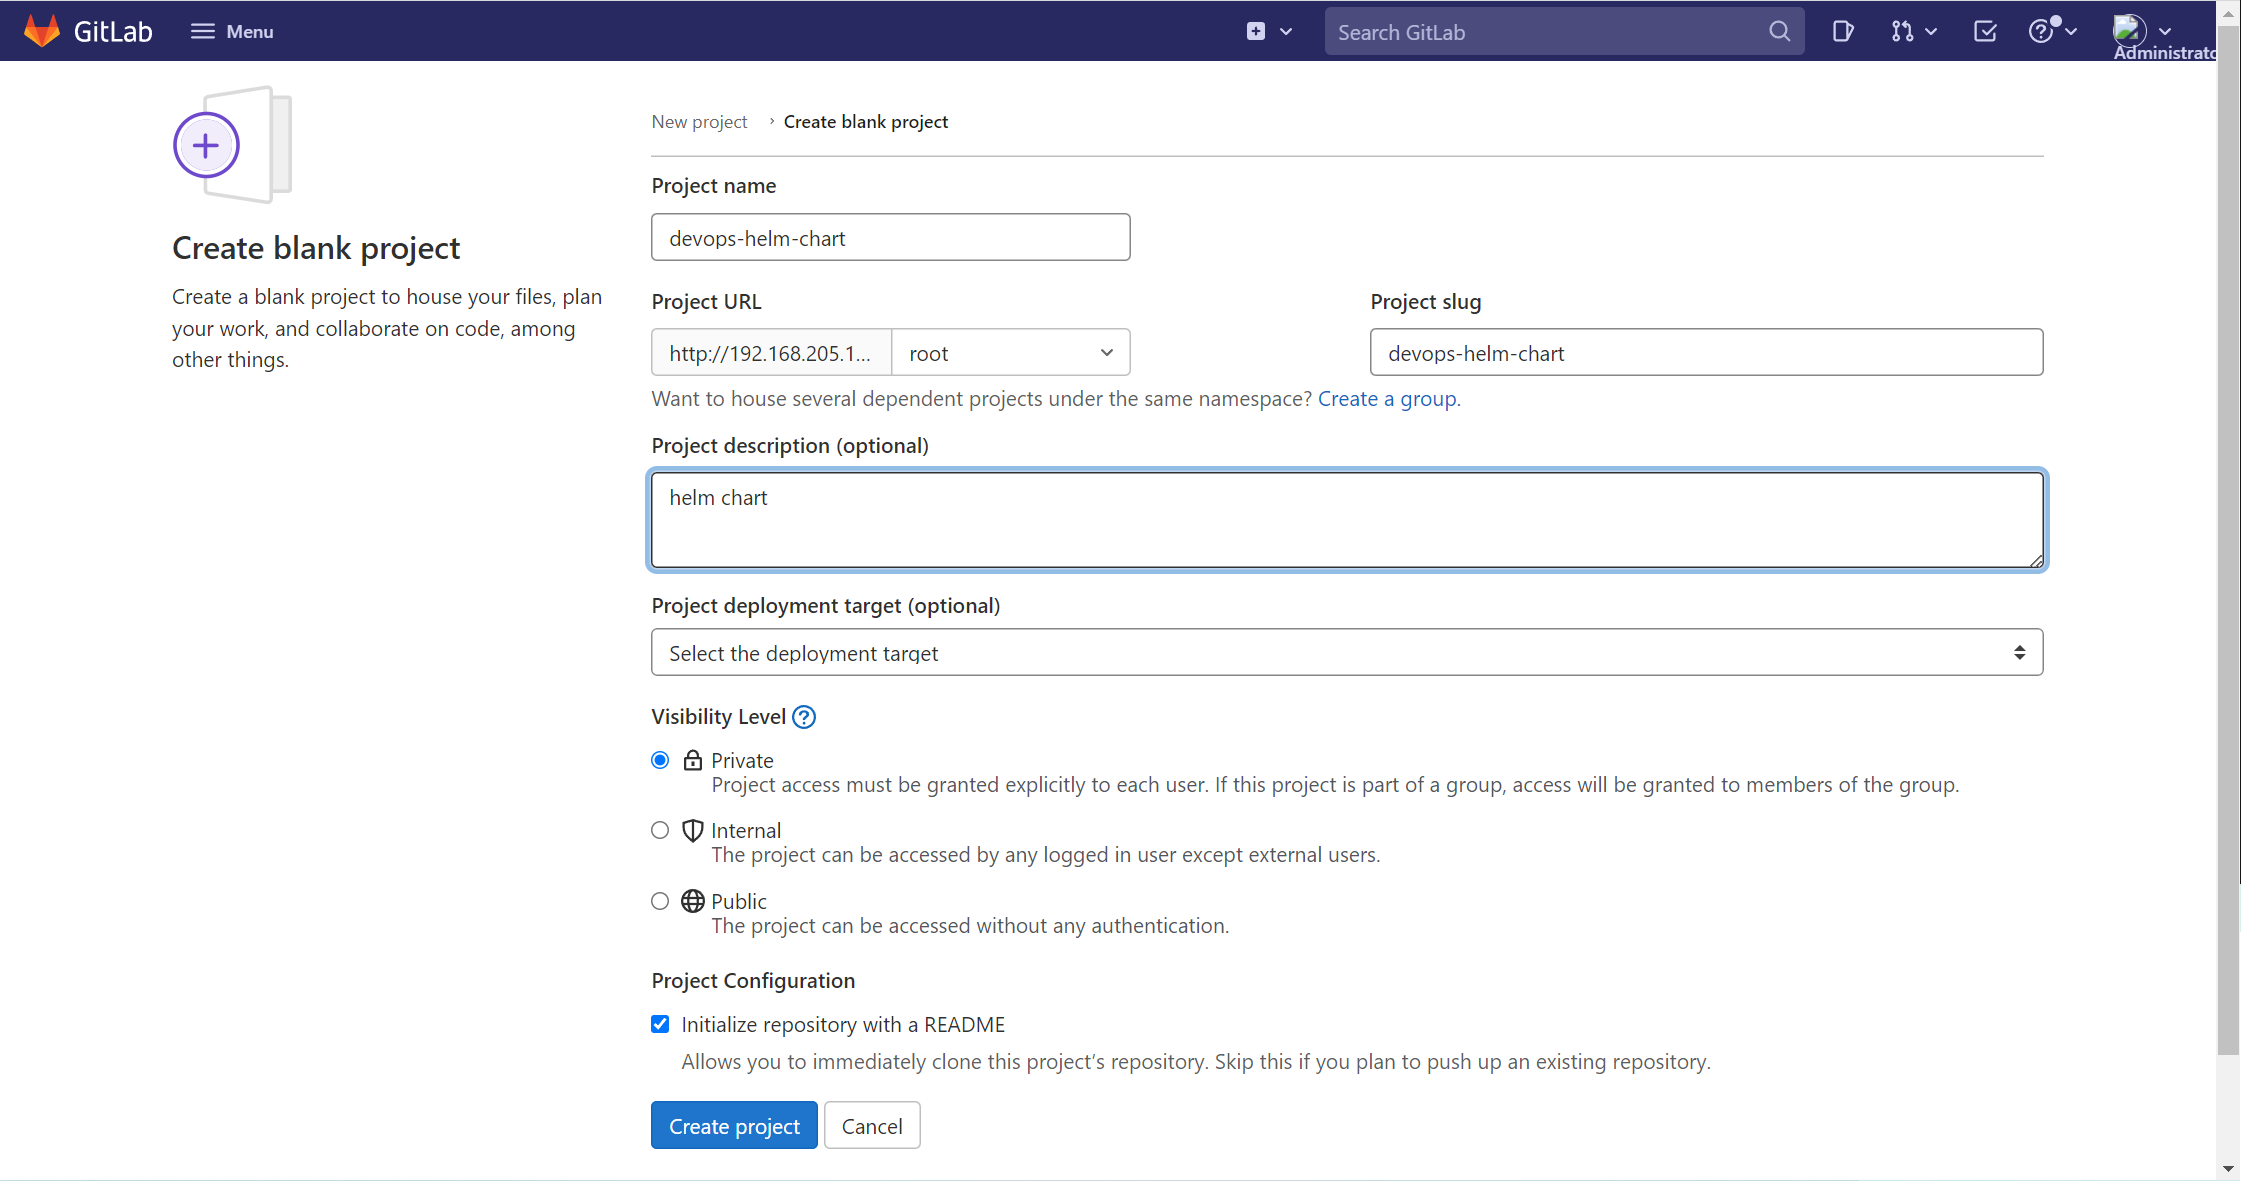
# 将 Helm Chart 保存到 Gitlab
因为 Argocd 是基于 GitOps 的实现,所以用它来部署应用也是基于 Git。
创建一个 devops-helm-chart 的仓库,如下:
让后将具体的 Helm Chart 推送到仓库。
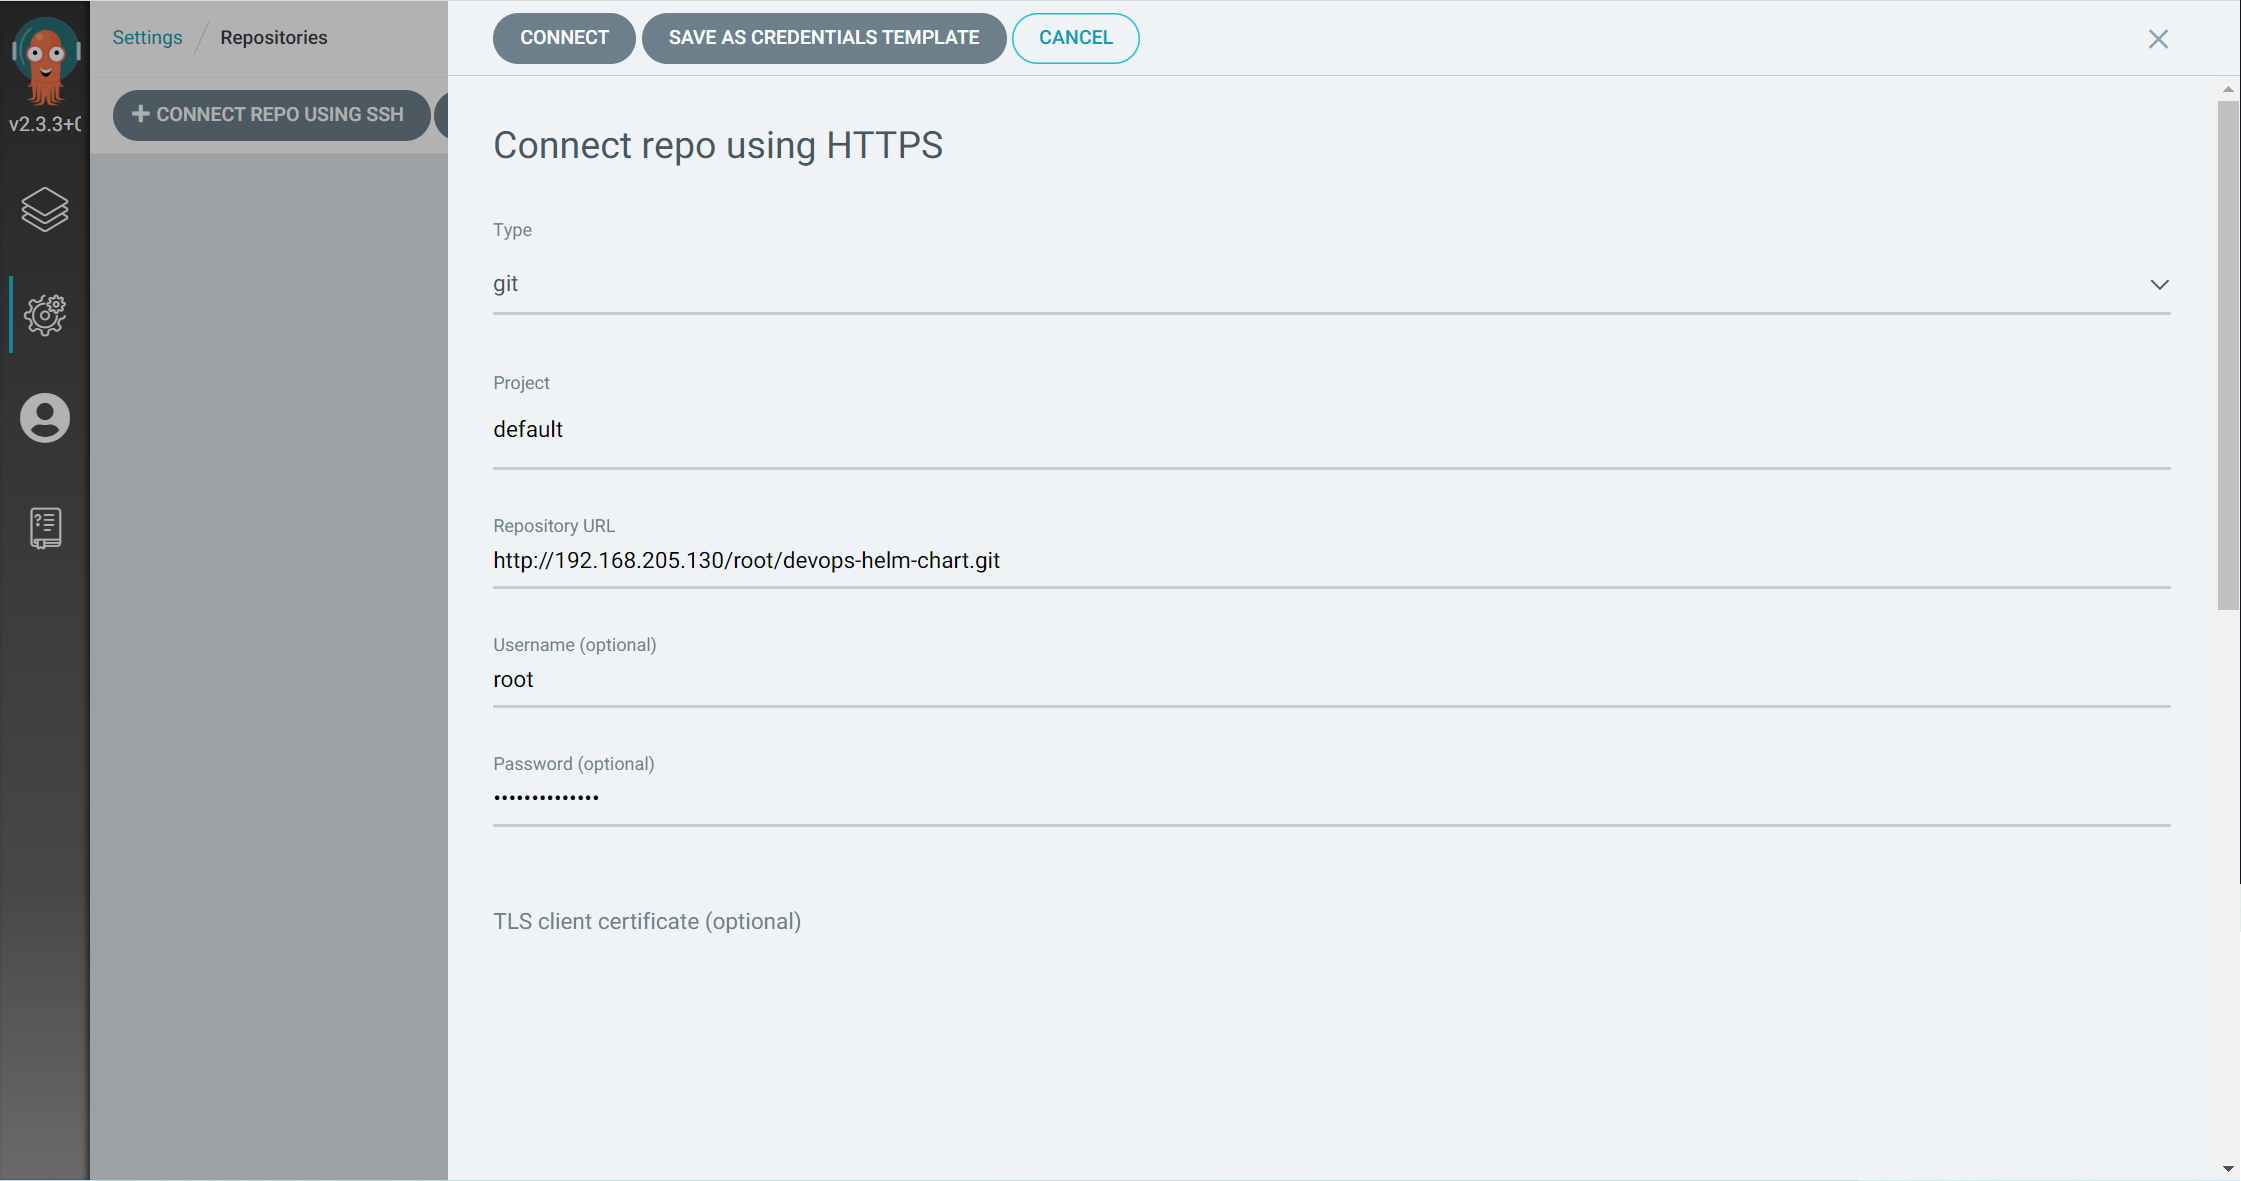
# 在 Argocd 上部署应用
# (1)添加仓库
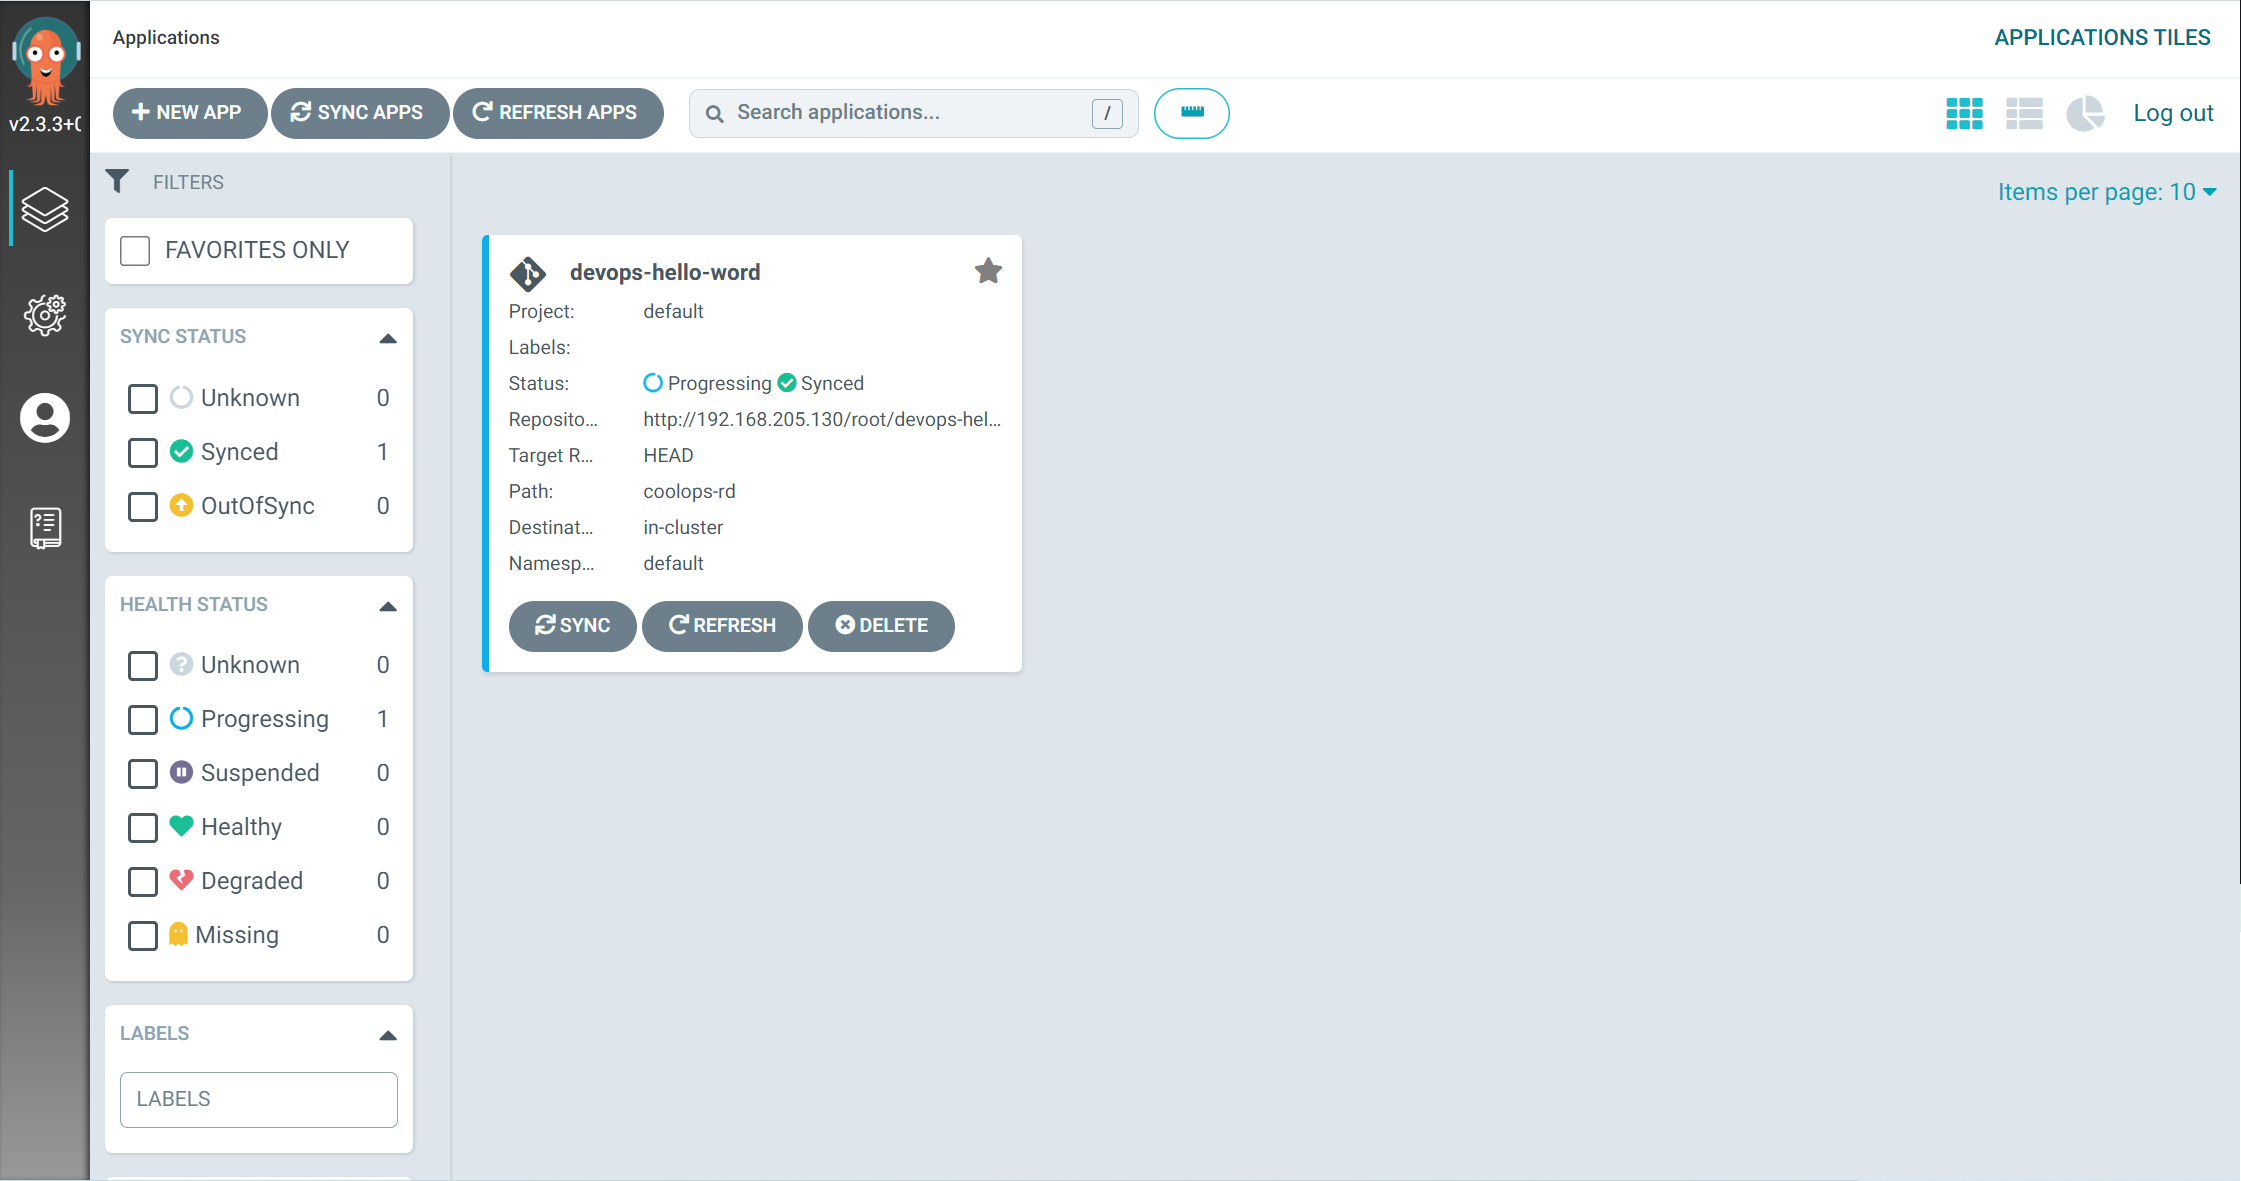
# (2)部署应用
# 改造 Tekton Pipeline
上面已经把基本需要的东西准备好了,下面就开始真正的改造了。
# 创建更改 Helm Chart 的 Task
顾名思义,Argocd 是基于 Git 来进行应用的生命周期管理,所以我们的应用变更最好也是基于 Git,这样整个流程是可追溯的。
apiVersion: tekton.dev/v1alpha1
kind: Task
metadata:
  name: deploy-to-gitlab
spec:
  workspaces:
    - name: source
    - name: kubernetesconfig
      mountPath: /root/.kube
  params:
    - name: IMAGE
    - name: TAG
    - name: GIT_USERNAME
    - name: GIT_PASSWORD
    - name: CHART_GITLAB_URL
    - name: GIT_NAME
      default: joker
    - name: GIT_EMAIL
      default: coolops@163.com
    - name: CHART_DIR
  steps:
    - name: run-change-helm-chart
      image: registry.cn-hangzhou.aliyuncs.com/coolops/helm-kubectl-curl-git-jq-yq:latest
      workingDir: $(workspaces.source.path)
      script: |
        git remote set-url origin http://$(params.GIT_USERNAME):$(params.GIT_PASSWORD)@$(params.CHART_GITLAB_URL)
        git config --global user.name "$(params.GIT_NAME)"
        git config --global user.email "$(params.GIT_EMAIL)"
        git clone http://$(params.GIT_USERNAME):$(params.GIT_PASSWORD)@$(params.CHART_GITLAB_URL) /opt/devops-cd
        cd /opt/devops-cd/$(params.CHART_DIR)
        git pull
        yq w --inplace values.yaml 'image.repository' "$(params.IMAGE)"
        yq w --inplace values.yaml 'image.tag' "$(params.TAG)"
        git commit -am 'image update'
        git push
2
3
4
5
6
7
8
9
10
11
12
13
14
15
16
17
18
19
20
21
22
23
24
25
26
27
28
29
30
31
32
33
34
35
# 修改 Tekton Pipeline
上面已经准备好了 Task,下面就是对 Pipeline 进行改造,改造后如下:
apiVersion: tekton.dev/v1beta1
kind: Pipeline
metadata:
  name: rd-argocd-pipeline
spec:
  workspaces: # 声明 workspaces
    - name: rd-repo-pvc
    - name: docker-config
  params:
    # 定义代码仓库
    - name: git_url
    - name: revision
      type: string
      default: "master"
    - name: gitInitImage
      type: string
      default: "registry.cn-hangzhou.aliyuncs.com/coolops/tekton-git-init:v0.29"
    # 定义镜像参数
    - name: pathToDockerfile
      description: The path to the build context, used by Kaniko - within the workspace
      default: .
    - name: imageUrl
      description: Url of image repository
    - name: imageTag
      description: Tag to apply to the built image
      default: latest
    - name: git_username
      type: string
      default: root
    - name: git_password
      type: string
    - name: chart_gitlab_url
      type: string
      default: 192.168.205.130/root/devops-helm-chart.git
    - name: git_name
      type: string
      default: joker
    - name: git_email
      type: string
      default: coolops@163.com
    - name: chart_dir
      type: string
      default: coolops-rd
    - name: app_name
      type: string
    # 定义代码扫描
    - name: sonar_username
      type: string
      default: admin
    - name: sonar_password
      type: string
      default: admin
    - name: sonar_url
      type: string
  tasks: # 添加task到流水线中
    - name: clone
      taskRef:
        name: git-clone
      workspaces:
        - name: output
          workspace: rd-repo-pvc
      params:
        - name: url
          value: $(params.git_url)
        - name: revision
          value: $(params.revision)
        - name: gitInitImage
          value: $(params.gitInitImage)
    - name: unit-test
      workspaces: # 传递 workspaces
        - name: source
          workspace: rd-repo-pvc
      taskRef:
        name: unit-test
      runAfter:
        - clone
    - name: build-push-image
      params:
        - name: pathToDockerfile
          value: $(params.pathToDockerfile)
        - name: imageUrl
          value: $(params.imageUrl)
        - name: imageTag
          value: $(tasks.clone.results.commit)
      taskRef:
        name: build-push-image
      runAfter:
        - unit-test
      workspaces: # 传递 workspaces
        - name: source
          workspace: rd-repo-pvc
        - name: dockerconfig
          workspace: docker-config
    - name: deploy-to-gitlab
      taskRef:
        name: deploy-to-gitlab
      params:
        - name: IMAGE
          value: $(params.imageUrl)
        - name: TAG
          value: $(tasks.clone.results.commit)
        - name: GIT_USERNAME
          value: $(params.git_username)
        - name: GIT_PASSWORD
          value: $(params.git_password)
        - name: CHART_GITLAB_URL
          value: $(params.chart_gitlab_url)
        - name: GIT_NAME
          value: $(params.git_name)
        - name: GIT_EMAIL
          value: $(params.git_email)
        - name: CHART_DIR
          value: $(params.chart_dir)
      workspaces:
        - name: source
          workspace: rd-repo-pvc
      runAfter:
        - build-push-image
    - name: sonar-scanner
      when:
        - input: $(params.revision)
          operator: in
          values:
            - test
      taskRef:
        name: sonar-scanner
      params:
        - name: SONAR_USERNAME
          value: $(params.sonar_username)
        - name: SONAR_PASSWORD
          value: $(params.sonar_password)
        - name: SONAR_URL
          value: $(params.sonar_url)
        - name: APP_NAME
          value: $(params.app_name)
      workspaces:
        - name: source
          workspace: rd-repo-pvc
2
3
4
5
6
7
8
9
10
11
12
13
14
15
16
17
18
19
20
21
22
23
24
25
26
27
28
29
30
31
32
33
34
35
36
37
38
39
40
41
42
43
44
45
46
47
48
49
50
51
52
53
54
55
56
57
58
59
60
61
62
63
64
65
66
67
68
69
70
71
72
73
74
75
76
77
78
79
80
81
82
83
84
85
86
87
88
89
90
91
92
93
94
95
96
97
98
99
100
101
102
103
104
105
106
107
108
109
110
111
112
113
114
115
116
117
118
119
120
121
122
123
124
125
126
127
128
129
130
131
132
133
134
135
136
137
138
# 修改 PipelineRun
上面已经把 Pipeline 准备好了,下面就 i 创建一个 PipelineRun 进行测试。
apiVersion: tekton.dev/v1beta1
kind: PipelineRun
metadata:
  name: devops-hello-world-pipeline-run
spec:
  pipelineRef:
    name: rd-argocd-pipeline
  params:
    - name: revision
      value: test
    - name: git_url
      value: http://192.168.205.130/root/devops-hello-world.git
    - name: imageUrl
      value: registry.cn-hangzhou.aliyuncs.com/coolops/devops-hello-world
    - name: imageTag
      value: latest
    - name: pathToDockerfile
      value: Dockerfile
    - name: git_password
      value: Joker@1qaz2wsx
    - name: app_name
      value: devops-hello-world
    - name: sonar_username
      value: admin
    - name: sonar_password
      value: Joker@123456
    - name: sonar_url
      value: http://sonarqube.coolops.cn
  workspaces:
    - name: rd-repo-pvc
      volumeClaimTemplate:
        spec:
          accessModes:
            - ReadWriteOnce
          storageClassName: local
          resources:
            requests:
              storage: 1Gi
    - name: docker-config
      secret:
        secretName: docker-config
  serviceAccountName: tekton-build-sa
2
3
4
5
6
7
8
9
10
11
12
13
14
15
16
17
18
19
20
21
22
23
24
25
26
27
28
29
30
31
32
33
34
35
36
37
38
39
40
41
42
然后在 Tekton Dashboard 上看到运行完成,如下:
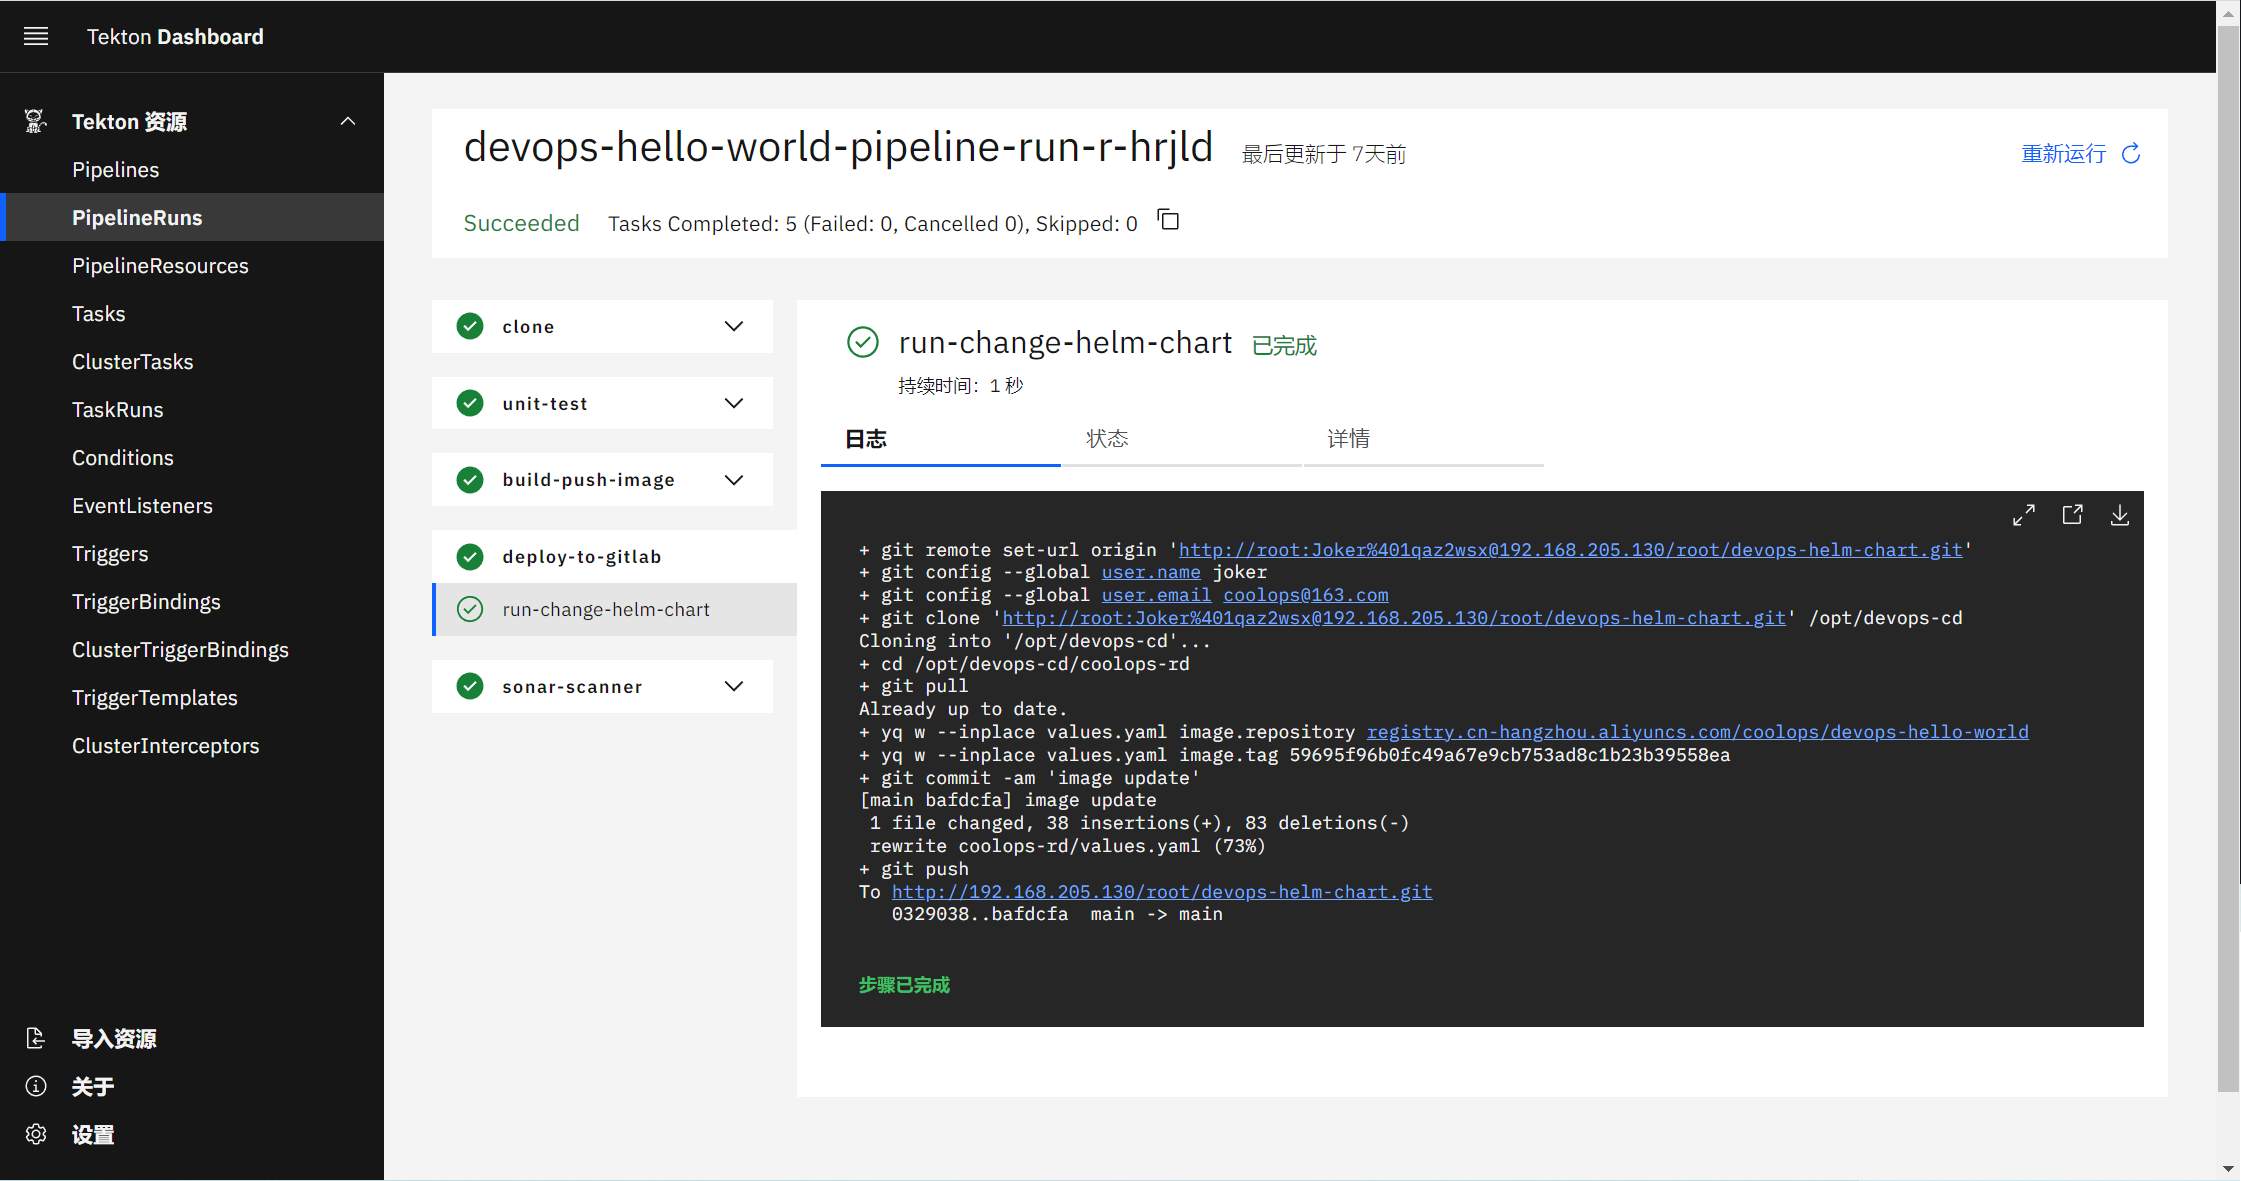
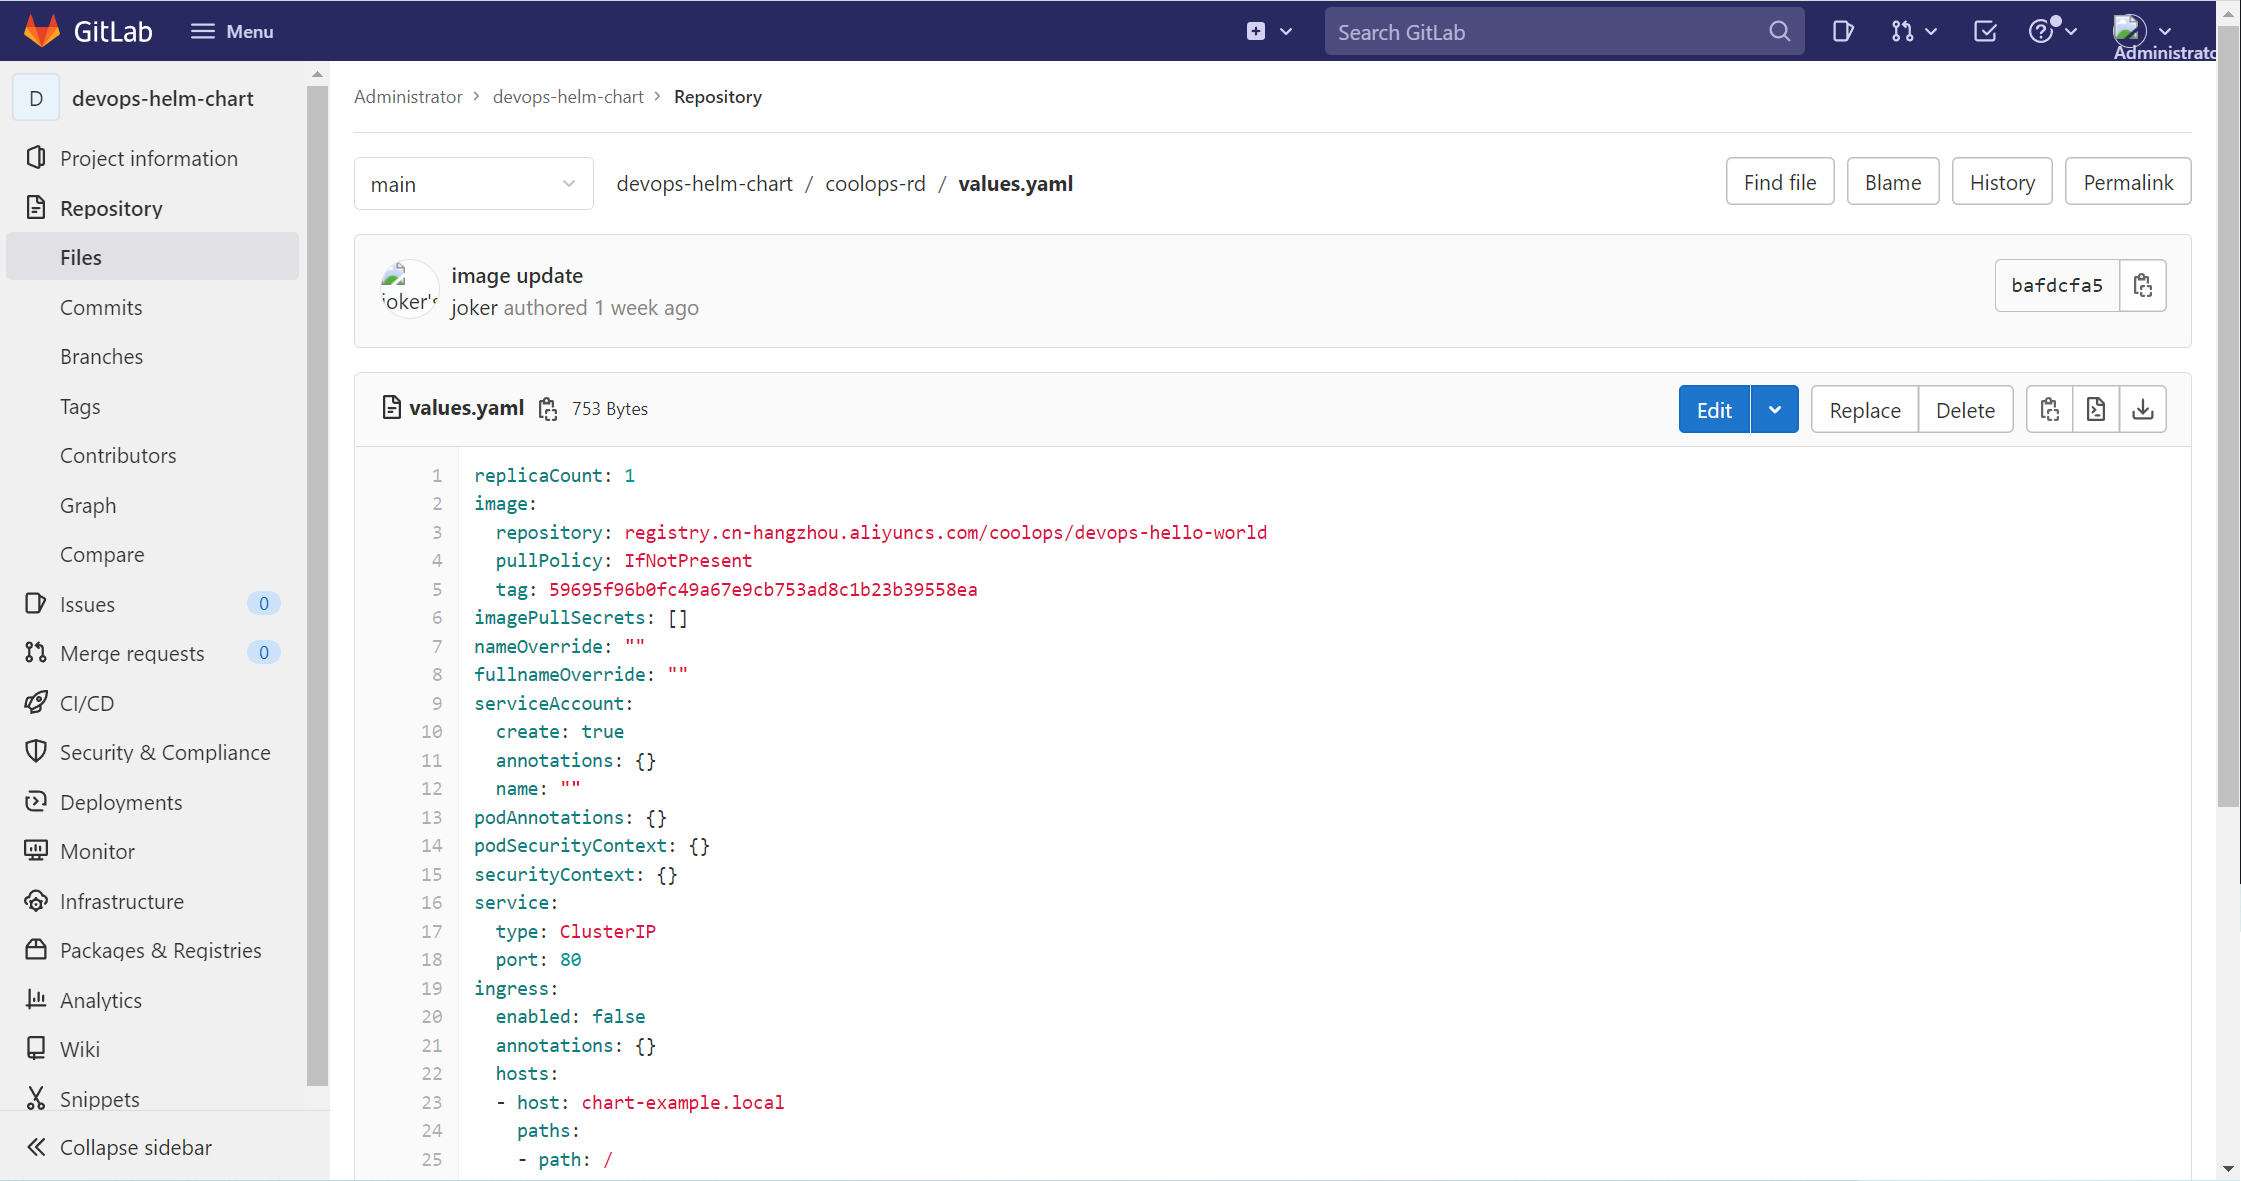
Chart 仓库中的 value.yaml 也进行了对应的更改,如下:
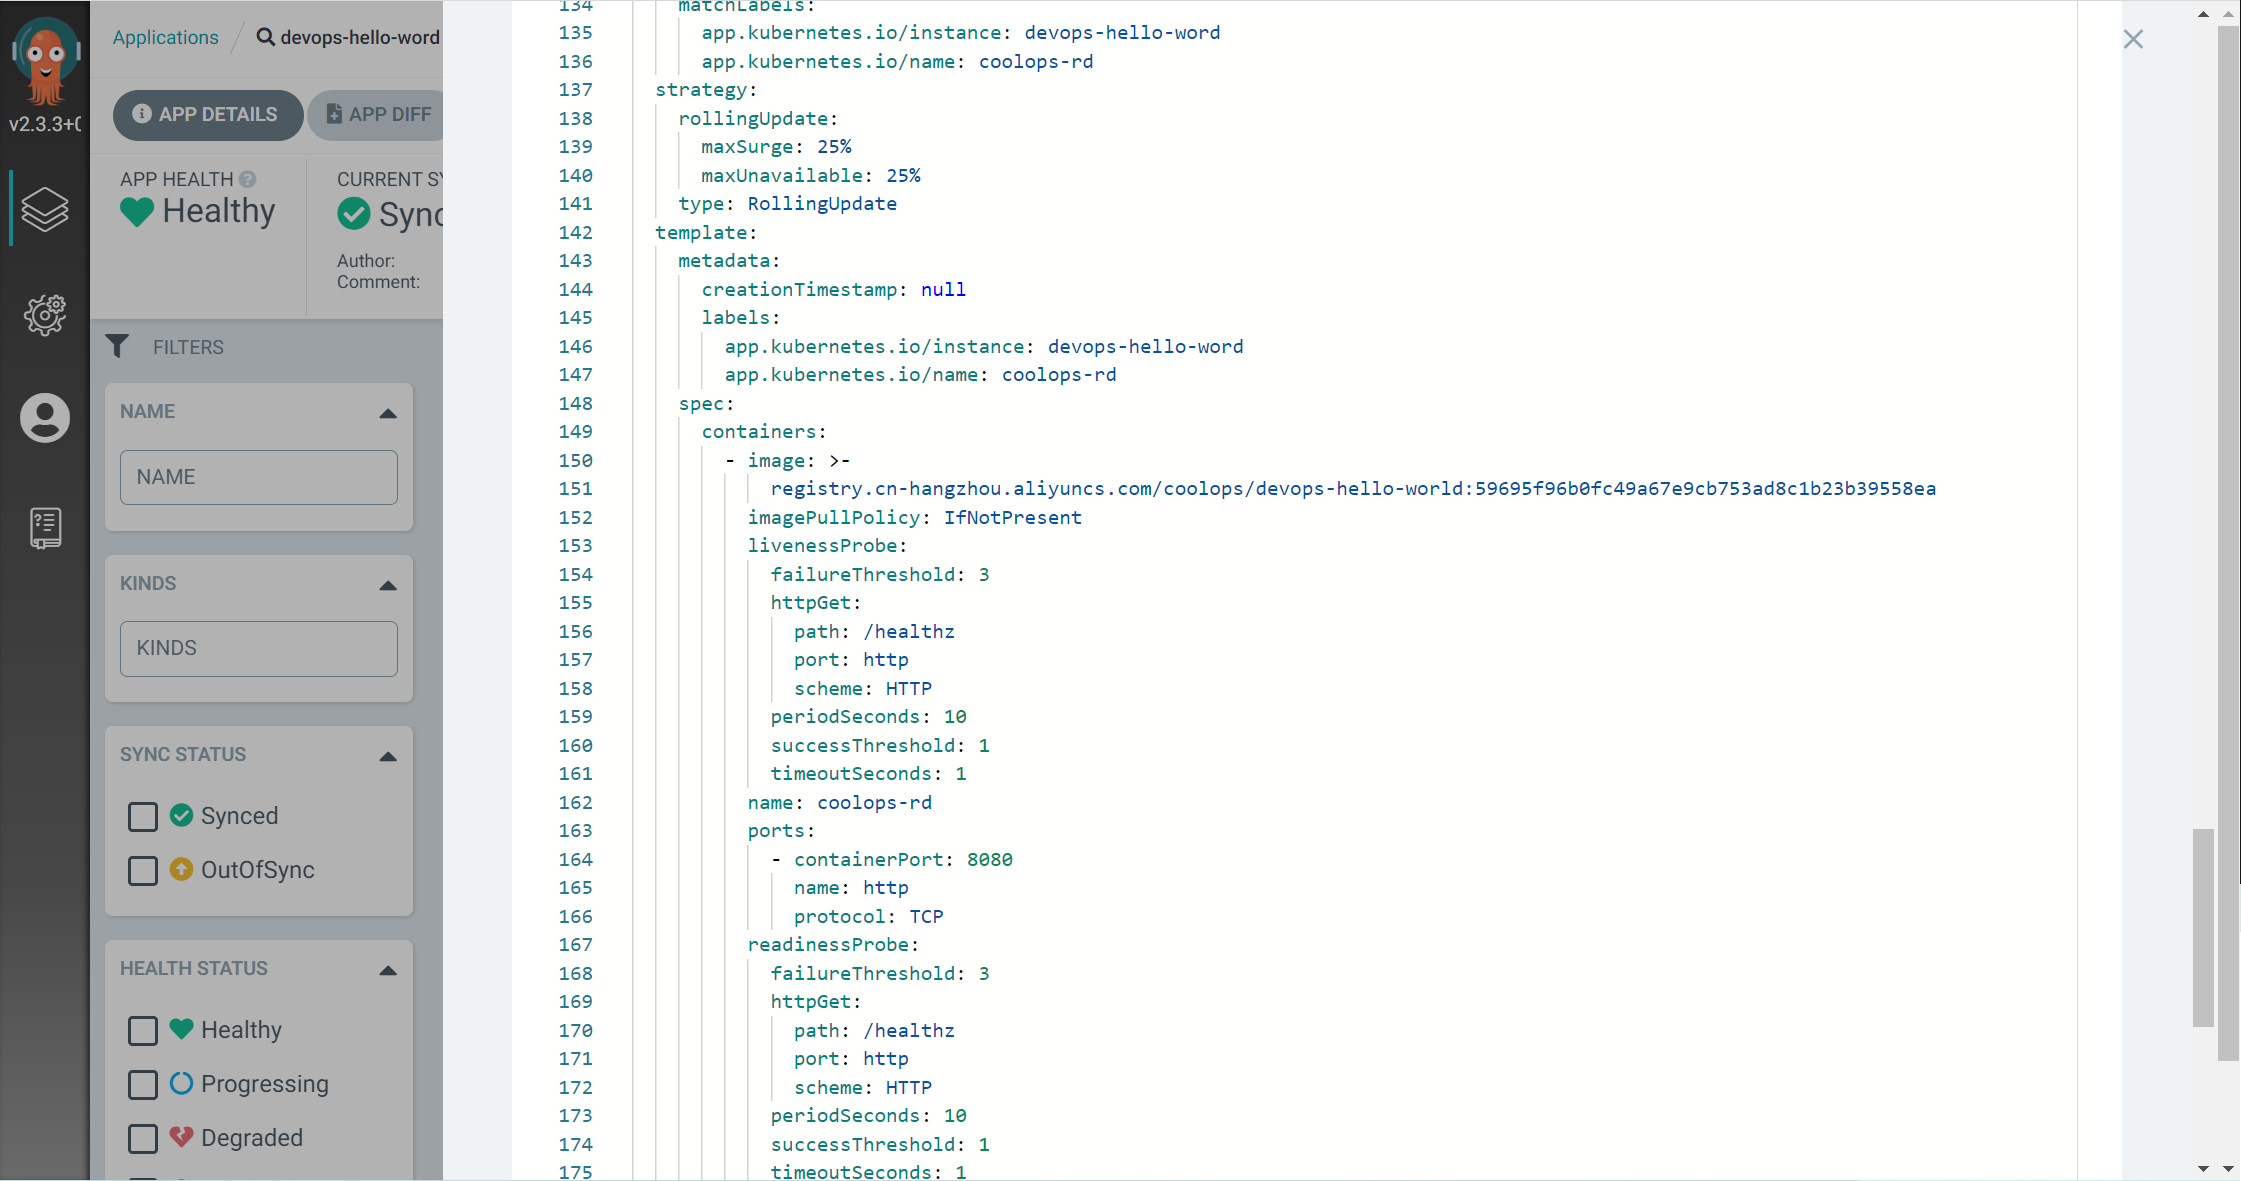
Argocd 也对应用进行了对应的更新,如下:
到此整个流水线的拆分以及使用就完成了。
# 最后
到这里,Tekton 系列文章基本告一段落了,整个系列耗时将近 2 个月,从最基础的安装,再慢慢到理论知识,以及最后的不同实践,不知道你掌握了多少?
分享是另一种学习,也是我比较推崇的一种学习方式,毕竟自己学和写出来还是有不少的距离,从学习到分享,可以不断的加深对知识的印象,也能很好的整理自己的知识体系,当然也希望对大家有所帮助。
《Tekton 系列文章》
- Tekton 系列之安装篇
- Tekton 系列之理论篇
- Tekton 系列之实践篇-我的第一条 Pipeline
- Tekton 系列之实践篇-由 Jenkins 改成 Tekton
- Tekton 系列之实践篇-使用 Jenkins 来管理 Tekton
- Tekton 系列之实践篇-使用 Trigger 让 Tekton 使用更简单
- Tekton 系列之实践篇-Tekton 和 Argocd 的梦幻联动
